Resource Center


What is VM Instance?

A VM instance is a virtual machine instance running on a host. A VM instance has its own IP address and can access public networks and run application services.
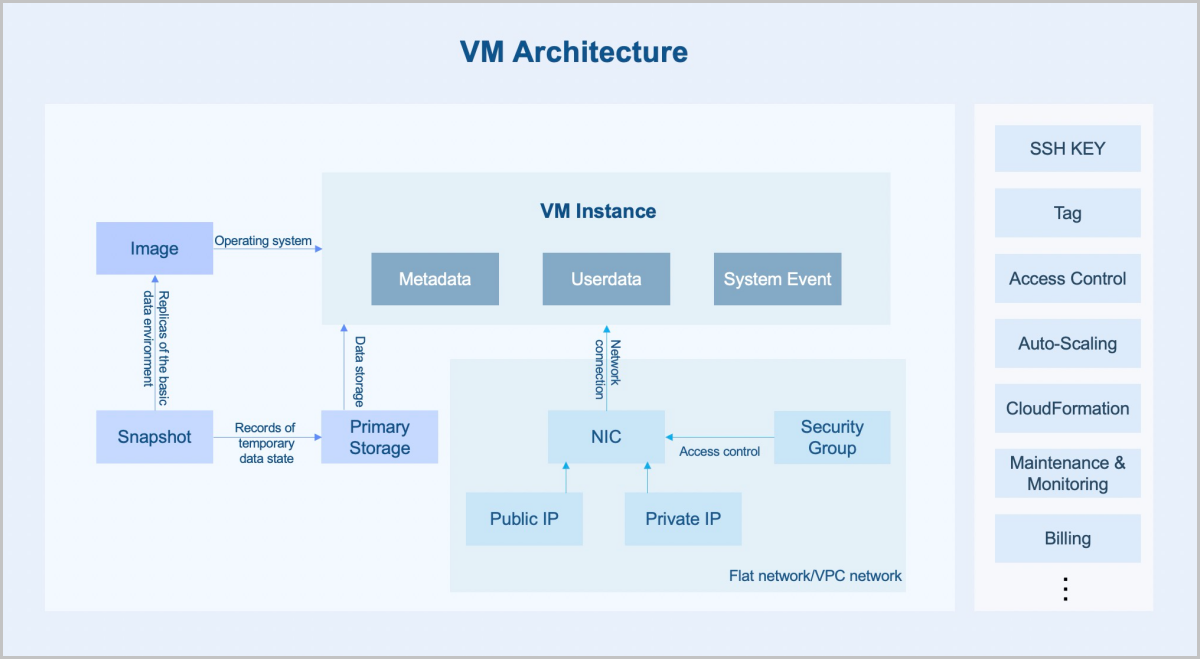
Architecture

A VM instance consists of the following core components:
  • Instance: A virtual machine instance running on a host. An instance includes the basic resources such as CPU, memory, operating system, network configurations, and disks.
  • Image: An image is a template file used to create a VM instance. Images provide the operating system required by a VM instance.
  • Primary storage: A primary storage is one or more servers that store volume files of VM instances. These files include root volume snapshots, data volume snapshots, image caches, root volumes, and data volumes.
  • Snapshot: A snapshot is a point-in-time capture of data status in a volume. Before you perform a business-sensitive operation on a VM instance, you can schedule snapshot creation at specified time points to record the state of the VM data. This allows rollback in case of breakdowns.
  • Networks:
    • Flat network: A flat network is connected to the network where the host is located and has direct access to the Internet. VM instances in a flat network can access public networks by using elastic IP addresses.
    • VPC network: A VPC network is a private network where VM instances can be created. A VM instance in a VPC network can access the Internet through a VPC vRouter.
  • Security group: A security group provides security control services for VM instances on the L3 network. It filters the ingress or egress TCP, UDP, and ICMP packets of specified VM instances in specified networks based on the specified security rules.
Figure 1. VM Architecture


Characteristics

VM instances have the following characteristics:
  • High availability (HA): You can set an HA mode for a VM instance. When the VM instance is stopped due to daily maintenance or exceptions, the HA policy can trigger the automatic restart of the VM instance to improve the VM availability.
  • Security:
    • The VM console allows you to conveniently monitor and manage VM instances. Note that you must have the corresponding permissions before you can log in to the VM console.
    • A VM instance supports IP/MAC/ARP anti-spoofing. Abnormal protocol access sent by the VM instance at the data link layer of a host is isolated to block MAC/ARP spoofing and achieve IP anti-spoofing at the network layer.
    • You can create an image for a VM instance. The image contains all of the information about the VM instance. You can quickly copy the corresponding resources through the image.
    • You can create a snapshot for a VM instance. Before you perform a business-sensitive operation on the VM instance, you can schedule snapshot creation at specified time points to record the state of the VM data. This allows rollback in case of breakdowns.
    • A VM instance supports encrypted storage of plain text passwords to protect sensitive data on the VM instance.
    • You can set a delete policy for a VM instance, including Direct, Delay, and Never. When you delete a VM instance in the UI, a dialog box is displayed to remind you of the consequences of deleting the VM instance. You must acknowledge the risks before you can delete it. This helps to reduce the risks caused by misoperations.
    • A VM instance supports role-based access control and permission management.
    • A VM instance supports operation logs and auditing, which can meet the needs of security analysis, intrusion detection, resource change tracking, and compliance auditing.
  • Scalability:
    • A VM instance allows you to modify its CPU and memory online and expand the attached root volumes and data volumes online. You can modify the VM configurations as needed.
    • A VM instance supports auto-scaling. The Cloud can automatically trigger VM auto-scaling or self-healing according to business changes.

Scenarios

VM instances can be used in the following scenarios:
  • Breaks down the traditional IT information silos.

    VM instances integrate the business of an enterprise on the cloud and migrate the information service system from traditional physical servers to VM instances. This helps to improve the resource utilization and reduce repeated investments. VM instances realize the rationalized scheduling of resources through intelligent load balancing services. In addition, the VM HA feature can deal with various exceptions to ensure business continuity of VM instances..

  • Improves the development and testing efficiencies of enterprises.

    For modern IT enterprises, the deployment and approval of a development and testing environment is time-consuming, which severely restricts the business launch cycle. With VM instances, resources can be allocated online, which helps to establish or recover a development and testing environment in seconds. This accelerates the business launch. In the same resource pool, an enterprise can develop its environment by using the encapsulated environment of a VM instance and arrange the testing plan more reasonably. After an application development is completed, resources occupied by the corresponding VM instance can be quickly released and assigned to other projects. You can plan resource configuration in advance and apply for immediate distribution as needed.

  • Deploys PaaS and SaaS services for enterprises.

    For enterprises that cannot migrate PaaS or SaaS services to the public cloud, they can use ZStack Cloud to build a private cloud environment and deploy the PaaS or SaaS services on VM instances. The flexibility, stability, and high concurrency characteristics of the VM instances help to ensure the security, stability, and high-efficiency of the enterprises.

  • Provides a safe rehearsal environment.

    In recent years, network attack defense is tilted towards attackers. Enterprises are facing severe cloud security challenges as various high-risk vulnerabilities, APT targeted attacks, and computer viruses emerged in an endless stream. By using VM instances, enterprises can build a completely isolated security rehearsal environment and ensure the business security with monitoring and alarming, log auditing, vulnerability management, anti-virus and other means.

  • 3D rendering, artificial intelligence (AI), and cloud desktop
    VM instances with GPU passthrough have strong computing capabilities and can be used in thin terminal scenarios such as 3D rendering, AI, and cloud desktops.
    • 3D rendering

      3D rendering is commonly used in movie production or three-dimensional video games. Due to the extremely high computational intensity, GPU server clusters are often used to provide computing abilities. ZStack Cloud provides GPU passthrough features, which enables extremely low performance loss (within 5%) as well as centralized and efficient cluster management. Coupled with intelligent monitoring and billing, VM instances can form a complete set of convenient and efficient rendering farm solution.

    • Artificial intelligence

      Enterprises can build a TensorFlow-based AI application by using VM instances with GPU passthrough. The powerful computing capabilities of GPU devices can fully meet the infrastructure requirements for large-scale model training.

    • Cloud desktop

      GPU devices play a critical role in the field of cloud desktop applications. GPU devices not only upgrade the desktop visual experience, but also assume the main computing role in special applications. Replacing traditional PC graphics stations, GPU devices allow users to implement their 3D work in a safer environment. By using VM instances with GPU passthrough and protocols such as RDP and PCoIP, users can fully enjoy the capabilities of graphics cards and obtain a near-physical machine experience.


Create a VM Instance (Fast Creation)

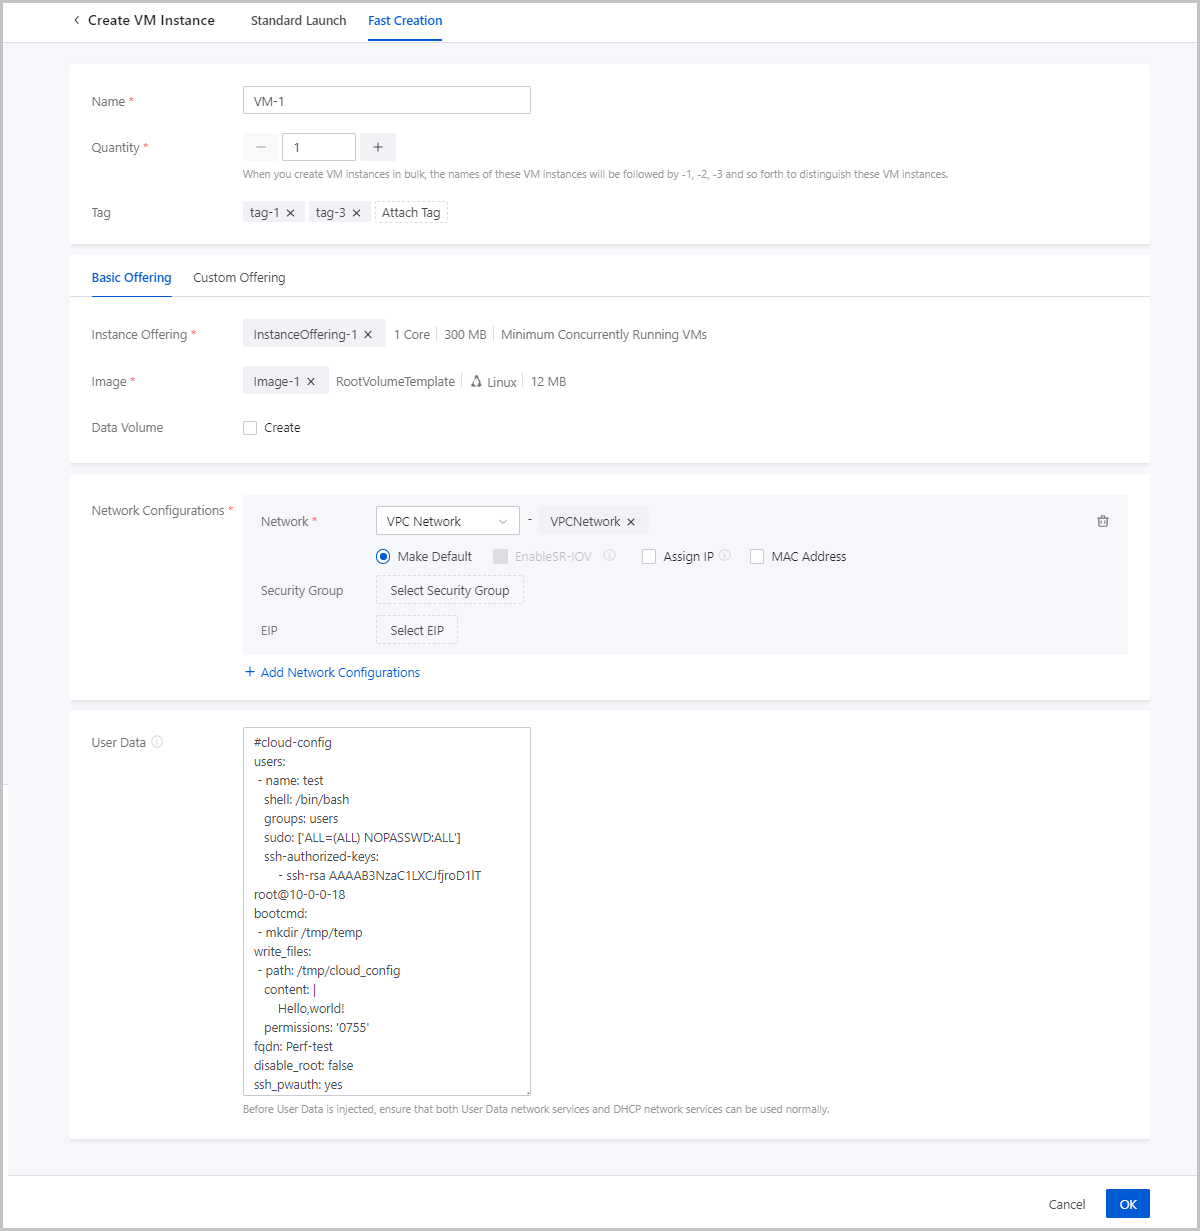
On the main menu of ZStack Cloud, choose Resource Center > Resource Pool > Virtual Resource > VM Instance. You can create a VM instance quickly through one of the following fast creation entrances:
  • Click the Fast Creation button on the right of Create VM Instance. Then, the Fast Creation page is displayed.
  • Click Create VM Instance. On the displayed page, click on Fast Creation.
On the Fast Creation tab page, set the following parameters:
  • Name: Enter a name for the VM instance. Note that the VM name must be 1 to 128 characters in length and can contain Chinese characters, letters, digits, hyphens (-), underscores (_), periods (.), parenthesis (), colons (:), and plus signs (+).
  • Quantity: Enter the number of VM instances to be created. Valid values: 1 to 100. You can change the maximum number by modifying the value of Maximum VM Creation in Batch on UI in the global setting.
    Note: When you create VM instances in bulk, the names of these VM instances will be followed by -1, -2, -3 and so forth to distinguish these VM instances.
  • Tag: Optional. Bind one or more tags to the VM instance as needed.
  • Set the VM offering by using one of the following methods:
    Basic Offering: Set the VM offering by selecting an existing instance offering and disk offering.
    • Instance Offering: Select an existing instance offering. The instance offering defines the number of CPU cores, memory size, host allocation strategy, and other configurations of the VM instance.
    • Image: Select an existing image. The image is used to install an operating system for the VM instance.
      Note: If you select an Windows-based ISO image that has enabled Virtio, the Virtio drive is attached to the image by default. You need to manually install the drive when you install the operating system. If you restart the VM instance on the UI, the drive will be detached.
    • Root Disk Offering: Select an existing disk offering for the root volume of the VM instance. The root disk offering defines the root volume information such as the size and disk bandwidth. This parameter appears only when the image type is ISO.
    • Data Volume: Optional. Choose whether to create a data volume and attach it to the VM instance. By default, no data volumes will be created.
      If you choose to create a data volume, set the following parameters:
      • Data Disk Offering: Select an existing disk offering for the data volume of the VM instance. The data disk offering defines the data volume information such as the volume size and disk bandwidth.
      • VirtIO SCSI: Optional. Choose whether to use a VirtIO SCSI bus to create a SCSI data volume.
        Note:
        • By default, VirtioSCSI is enabled if a shared storage is used, indicating that you can create VirtIO SCSI volumes.
        • If a LocalStorage primary storage is used, you can enable VirtioSCSI on the volume details page.
        • VirtIO SCSI volumes support multiple I/O queues, which can be identified as IDs (WWN).
        By default, a VirtIO SCSI bus is used to create SCSI data volumes for shared storages. We recommend that you do not create SCSI data volumes for LocalStorage primary storages.
    Custom Offering: Set the VM offering by customizing the following VM configurations:
    • CPU: Set the number of CPU cores of the VM instance. Valid values: 1 to 1024, integer.
    • Memory: Set the memory size of the VM instance. Valid values: 16 MB to 1000 TB, integer. Unit: MB, GB, and TB.
    • Image: Select an existing image. This image is used to install an operating system for the VM instance.
      Note: If you select an Windows-based ISO image that has enabled Virtio, the Virtio drive is attached to the image by default. You need to manually install the drive when you install the operating system. If you restart the VM instance on the UI, the drive will be detached.
    • Root Volume: Set the size of the root volume. Valid values: 1 MB to 1024 TB, integer. Unit: MB, GB, and TB. This parameter appears only when the image type is ISO.
    • Data Volume: Optional. Choose whether to create a data volume with the VM instance. By default, no data volumes will be created.
      If you choose to create a data volume, set the following parameters:
      • Data Volume Size: Set the size of the data volume. Valid values: 1 MB to 1024 TB, integer. Unit: MB, GB, and TB.
      • VirtIO SCSI: Optional. Choose whether to use a VirtIO SCSI bus to create a SCSI data volume.
        Note:
        • By default, VirtioSCSI is enabled if a shared storage is used, indicating that you can create VirtIO SCSI volumes.
        • If a LocalStorage primary storage is used, you can enable VirtioSCSI on the volume details page.
        • VirtIO SCSI volumes support multiple I/O queues, which can be identified as IDs (WWN).
        By default, a VirtIO SCSI bus is used to create SCSI data volumes for shared storages. We recommend that you do not create SCSI data volumes for LocalStorage primary storages.
  • Network Configurations: Configure the networks used by the VM instance. You can add multiple networks as needed.
    • Network: Select an L3 network for the VM instance. Supported network types: VPC network, public network, and flat network.
    • Make Default: Set one of the networks as the default network of the VM instance.
    • Enable SR-IOV: Optional. Choose whether to use SR-IOV to generate a VF NIC and pass it through to the VM instance. By default, SR-IOV is disabled. You can enable it if you have qualified hardware resources.
      Note: To enable SR-IOV, note that:
      • Make sure that SR-IOV is enabled for the L2 network corresponding to the L3 network of the VM instance. Otherwise, SR-IOV cannot be enabled.
      • Enabling SR-IOV generates a VF NIC and passes it through to the VM instance. If not enabled, a vNIC will be assigned to the VM instance.
      • Before you enable SR-IOV, make sure that the physical NIC corresponding to the L3 network has an available VF NIC. Otherwise, the VM instance might fail to be created.
    • Assign IP: Optional. Choose whether to assign an IP address to the VM NIC. By default, the Cloud assigns an IP address to the VM instance through DHCP.
      Note: To assign an IP address, note that:
      • The IP address must be unique within the network segment of the selected network.
      • By default, the drop-down menu displays 5 recommended IP addresses. If the current network has less than 5 IP addresses, all available IP addresses will be displayed.
      • If you create VM instances in bulk and assign an IP address here, the Cloud automatically assigns IP addresses to these VM instances with the first assigned IP address as the start IP. If an IP address is occupied or if IP addresses are insufficient within the continuously assigned IP range, the corresponding VM instance will fail to be created.
      • If DHCP is not enabled for the L3 network, we recommend that you assign an IP address to the VM instance.
    • MAC Address: Optional. Choose whether to customize a MAC address for the VM instance. By default, the Cloud assigns a MAC address to the VM instance.
    • Security Group: Optional. Associate a security group with the VM instance.
    • EIP: Optional. Associate an elastic IP address (EIP) with the VM instance.
  • User Data: Optional. Inject user-defined parameters or scripts to customize configurations for the VM instance or to accomplish specific tasks.
    Note: To use user data, note that:
    • Before you import user data, make sure that both the user data network service and DHCP network service work as expected.
    • Before you inject user data to Linux-based VM instances, make sure that cloud-init is installed on the images of the VM instances. We recommend that you install cloud-init 0.7.9, 17.1, 19.4, 19.4, or later.
    • Before you inject user data to Windows-based VM instances, make sure that Cloudbase-Init is installed on the images of the VM instances. You can install Cloudbase-Init of any version.
    • If you set a root user password in user data for a VM instance, the password is displayed in the User Data option on the details page of the VM instance. Make sure that your password is well protected.
Figure 1. Create VM Instance (Fast Creation)


Download

Already filled the basic info? Click here.

Enter at least 2 characters.
Invalid mobile number.
Enter at least 4 characters.
Invalid email address.
Wrong code. Try again. Send Code Resend Code (60s)

An email with a verification code will be sent to you. Make sure the address you provided is valid and correct.

Download

Not filled the basic info yet? Click here.

Invalid email address or mobile number.

Email Us

contact@zstack.io
ZStack certification training consulting
Enter at least 2 characters.
Invalid mobile number.
Enter at least 4 characters.
Invalid email address.
Wrong code. Try again. Send Code Resend Code (60s)

Email Us

contact@zstack.io

The download link is sent to your email address.

If you don't see it, check your spam folder, subscription folder, or AD folder. After receiving the email, click the URL to download the documentation.

The download link is sent to your email address.

If you don't see it, check your spam folder, subscription folder, or AD folder.
Or click on the URL below. (For Internet Explorer, right-click the URL and save it.)

Thank you for using ZStack products and services.

Submit successfully.

We'll connect soon.

Thank you for choosing ZStack products and services.

Back to Top