Add an Image
An image is a template file used to create a VM instance or volume. Images are categorized into system images and volume images.
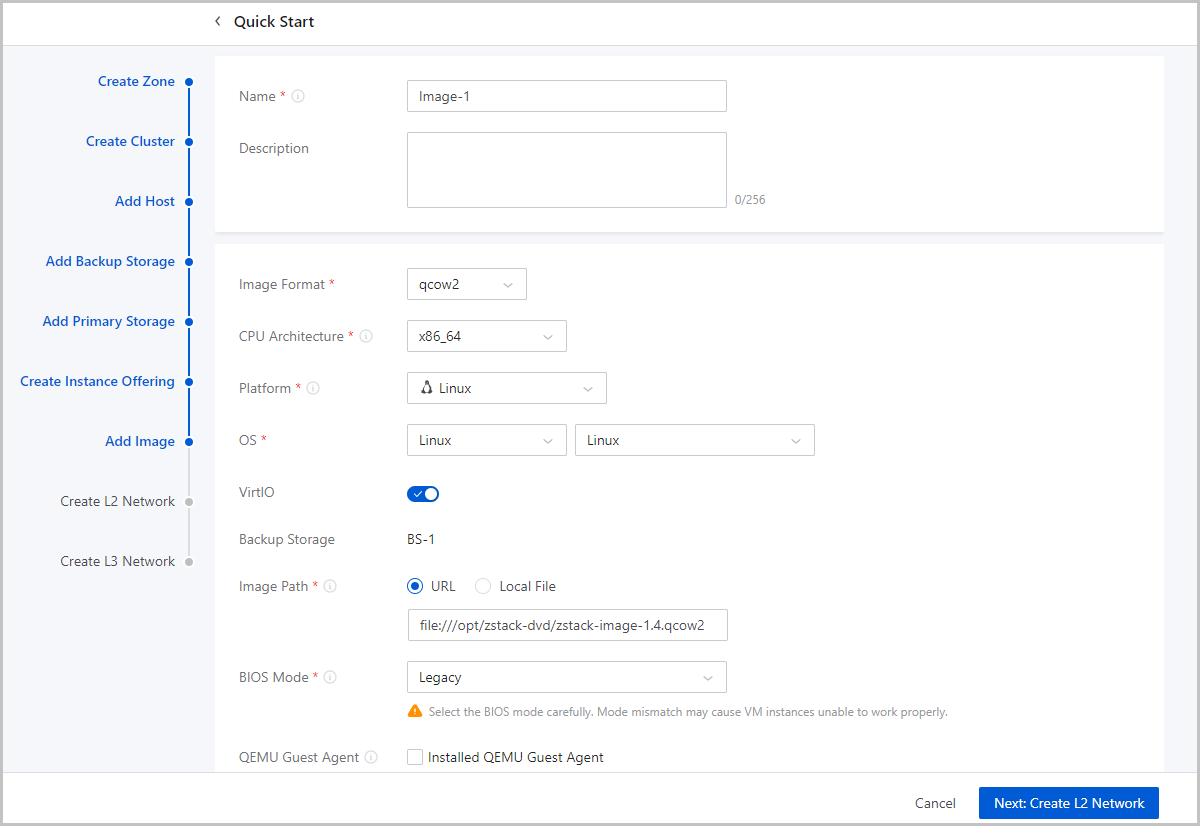
On the displayed page, set the following parameters:
- Name: Enter a name for the image.
- Description: Optional. Enter a description for the image.
- Image Format: Select an image format. You can select qcow2, iso, or raw based on the image file property.
- Platform: Select an image platform type. Valid
values: Linux, Windows, WindowsVirtio, Other, and
Paravirtualization.
 Note: The Other platform type allows compatibility
with earlier versions of an OS.
Note: The Other platform type allows compatibility
with earlier versions of an OS. - Image Path: Specify an image URL or upload a local
file:
- URL: Enter a specified URL to add an image.
You can enter a URL by using either of the following syntax:
- A URL that starts with http or https:
- Syntax: http://host[:port]/path/file or https://host[:port]/path/file.
- Example: http://cdn.zstack.io/product_downloads/images/zstack-image.qcow2
- A URL that starts with ftp:
- Syntax that does not specifies the user:
ftp://hostname[:port]/path/file.
Example: ftp://172.20.0.10/pub/zstack-image.qcow2.
- Syntax that specifies the user:
ftp://user:password@hostname[:port]/path/file.
Example: ftp://zstack:password@172.20.0.10/pub/zstack-image.qcow2.
- Syntax that does not specifies the user:
ftp://hostname[:port]/path/file.
- A URL that starts with sftp:
- Syntax that specifies the user identity:
sftp://user:password@hostname[:port]/path/file.
Example: sftp://root:password@172.20.0.10/pub/zstack-image.qcow2.
- User-identity-free syntax:
sftp://user@hostname[:port]/path/file.
Example: sftp://root@172.20.0.10/pub/zstack-image.qcow2.
- Syntax that specifies the user identity:
sftp://user:password@hostname[:port]/path/file.
- The absolute path of an image file that is stored on a
backup storage. The backup storage that stores the image
file can be an ImageStore backup storage.
Example: file:///opt/zstack-dvd/zstack-image-1.4.qcow2.
Note:
- The image file to be added to the destination backup storage must exist and the backup storage needs to have access to the URL of the image file.
- If you enter a URL that starts with sftp and does not specify user identity, make sure that you enable mutual password-free SSH login between the backup storage and SFTP server.
- For the progress bar and resumption from breakpoint
features:
- If you use an ImageStore backup storage, a progress bar will appear to display the upload progress. In addition, upload resumption from breakpoints is also supported.
- If you use a Ceph backup storage, a progress bar will appear to display the upload progress. However, upload resumption from breakpoints is not supported.
- If you specify a URL with the
file:/// syntax to add an
image:
- Ceph backup storage does not support the file:/// syntax.
- The three forward slashes (/) in file:/// represents the absolute path of a file on a backup storage. For example, if you specify the URL file:///opt/zstack-dvd/image-1.4.qcow2, you add the image file named image-1.4.qcow2 in the /opt/zstack-dvd path of a backup storage to the Cloud.
- A URL that starts with http or https:
- Local File: Select a local image file that the current browser can access and upload the image file to the specified backup storage. The backup storage that stores the image file can be an ImageStore or Ceph backup storage.
- URL: Enter a specified URL to add an image.
You can enter a URL by using either of the following syntax:
- BIOS Mode: Select a BIOS mode.
You can select the Legacy or UEFI mode.
- Legacy: This mode supports all operating systems (OSs) and ensures stable operation. We recommend you select this mode.
- UEFI: This mode supports Windows and CentOS.
Note: Mode mismatch may cause VM instances unable
to work as expected. Select a mode based on your business needs:- If you add an image in qcow2 or raw format, select the mode consistent with the mode used when the image was created.
- If you add an image in iso format, you can select either of the two modes. OS will be boot based on the selected mode.
- If you want to boot the OS of a VM instance in UEFI mode, we
recommend that you select a VM image that is created from one of
the OS listed in the following table.
OS BIOS Mode Supported Versions Windows UEFI - Windows 8 or later
UEFI - Windows 7
- Windows Server 2008 R2
Linux UEFI - CentOS 7.2
- CentOS 7.3
- CentOS 7.4 or later
- If you use a Window-based VM instance such
as Windows Server 2012 R2, Windows Server 2016, or Windows 10
that has its OS boot in UEFI mode, the following figure will
display after you start the VM instance. In this case, press any
key to continue the installation of the OS. Otherwise, the
system will enter the UEFI Shell.If you have entered the UEFI Shell, run the following commands to exit the UEFI Shell:
Figure 2. Press Any Key to Continue 
Then press any key in a timely manner. Otherwise, the system will reenter the UEFI Shell.Shell> fs0: FS0:\> dir FS0:\> cd EFI FS0:\EFI\> cd BOOT FS0:\EFI\BOOT\> BOOTX64.EFI
- QEMU Guest Agent: Optional. Choose whether the
current image has installed QEMU Guest Agent (QGA).Note: If the image has
installed QGA and has set the agent as auto-start and you use the image
to create a VM instance, you can modify the passwords of this VM
instance, the clones of this VM instance, and the VM instances created
from the image that is created from this VM instance when all these
instances are in running state.
- Support Elastic Baremetal Instance:
Optional. Choose whether the image can be used to create an elastic
baremetal instance. If enabled, the image can be used to create an elastic
baremetal instance. Note: When you add an image of an elastic baremetal
instance, make sure:
- The image has installed the agent. Otherwise, after you use the image to create an elastic baremetal instance, you cannot open the console or modify the password of the elastic baremetal instance. In addition, you cannot attach a volume or network to the instance or detach a volume or network from the instance.
- The BIOS mode of the image is the same the system configuration. Default: UEFI. If you want to use Legacy, contact the technical support.