Create an Auto-Scaling Group
On the main menu of ZStack Cloud, choose . On the Auto-Scaling Group page, click Create Auto-Scaling Group. Then, the Create Auto-Scaling Group page is displayed.
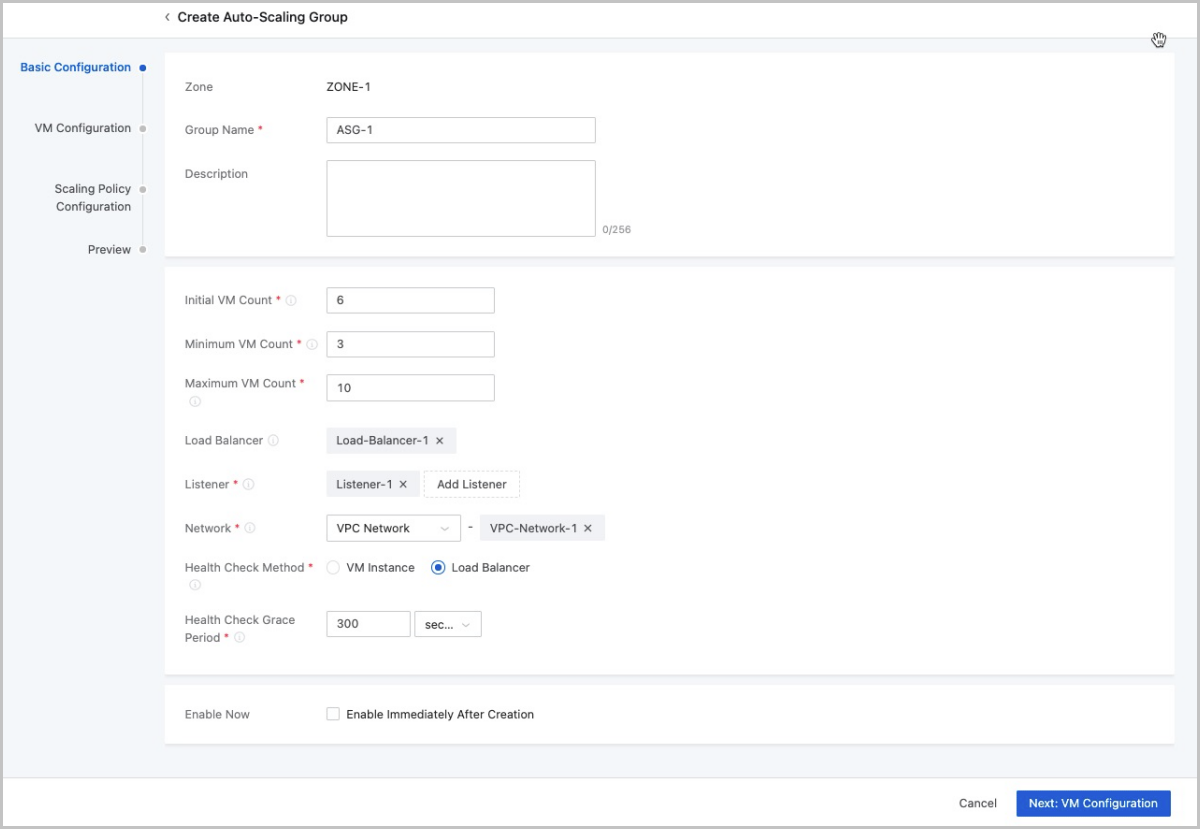
- Complete the basic configuration.To complete this step, set the following parameters:
- Zone: By default, the current zone is displayed.
- Group Name: Enter a name for the auto-scaling
group.
The name must be 1 to 128 characters in length and can contain Chinese characters, English letters, digits, hyphens (-), underscores (_), periods (.), parenthesis (), colons (:), and plus signs (+).
- Description: Optional. Enter a description for the auto-scaling group.
- Initial VM Count: Enter the initial number of
VM instances in the group.
- If you create an auto-scaling group for the first time, the number of VM instances in the group is equal to the initial VM count.
- The initial VM count must be an integer ranging from 1 to 1000. Make sure that the initial VM count is between the minimum VM count and the maximum VM count. Make your configurations as needed.
- Minimum VM Count: Enter the minimum number of
VM instances in the auto-scaling group.
- When a scale-in policy is configured, the number of VM instances in the auto-scaling group must not be smaller than that of the specified minimum VM count.
- The minimum VM count must be an integer ranging from 1 to 1000. Make your configurations as needed.
- Maximum VM Count: Enter the maximum number of
VM instances in the auto-scaling group.
- When a scale-out policy is configured, the number of VM instances in the group must not be greater than that of the specified maximum VM count.
- The maximum VM count must be an integer ranging from 1 to 1000. Make your configurations as needed.
- If you choose to configure the load balancing service (recommended),
set the following parameters:
- Load Balancer: Select a load
balancer.
- Before you can select a load balancer, create it first and then associate one or more listeners with it.
- Listener: Select a listener that is
associated with the load balancer.
- The listener list displays all listeners associated with the load balancer.
- If you select multiple listeners, they listen on their respectively configured ports of VM instances in the auto-scaling group.
- Network: Select an L3 network used
for creating VM instances.
- If you do not use the load balancing service, you can select a VPC network or flat network. Specifically, the VPC network must be attached to a VPC vRouter.
- If you use the load balancing service, the network to be selected must be included in the backend network of the load balancer.
- Health Check Method: Select a health
check method. The load balancer-based health check method is
recommended.
- VM-based health check: This method checks the health status of VM instances in real time. If a VM instance is detected in stopped, unknown, or deleted state, the VM instance is considered to be unhealthy. Then, the VM instance is automatically removed from the auto-scaling group and a new one is created. This ensures the number of healthy VM instances in an auto-scaling group is not less than the specified minimum VM count.
- Load balancer-based health check: This method is a built-in mechanism of load balancers.
- Health Check Grace Period: Set the
health check grace period after you select the load
balancer-based health check method.
- The health check grace period is a period of time after VM instances in the auto-scaling group are created and booted. During this period of time, application services related to these VM instances are probably still booting, and the auto-scaling group will not perform load balancer-based health checks. If this period of time is exceeded, the health status of the VM instances are monitored based on the health check mechanism of the load balancer.
- The grace period must be an integer greater than 10. Unit: second, minute, and hour.
- Load Balancer: Select a load
balancer.
- If you do not configure the load balancing service, set the
following parameters:
- Load Balancer: Leave this field blank.
- Network: Select a private L3
network.
 Note: Currently, our auto-scaling service offers
auto-scaling capabilities that let you automatically add
or delete VM instances in the scenarios such as VPC
networks and flat networks.
 - Health Check Method:
- VM-based health check: This method checks the health status of VM instances in real time. If a VM instance is detected in stopped, unknown, or deleted state, the VM instance is considered to be unhealthy. Then, the VM instance is automatically removed from the auto-scaling group and a new one is created. This ensures the number of healthy VM instances in an auto-scaling group is not less than the specified minimum VM count.
- Enable Immediately After Creation: Choose whether to enable the auto-scaling group immediately after creation. By default, the group is not enabled immediately.
Figure 1. Basic Configuration 
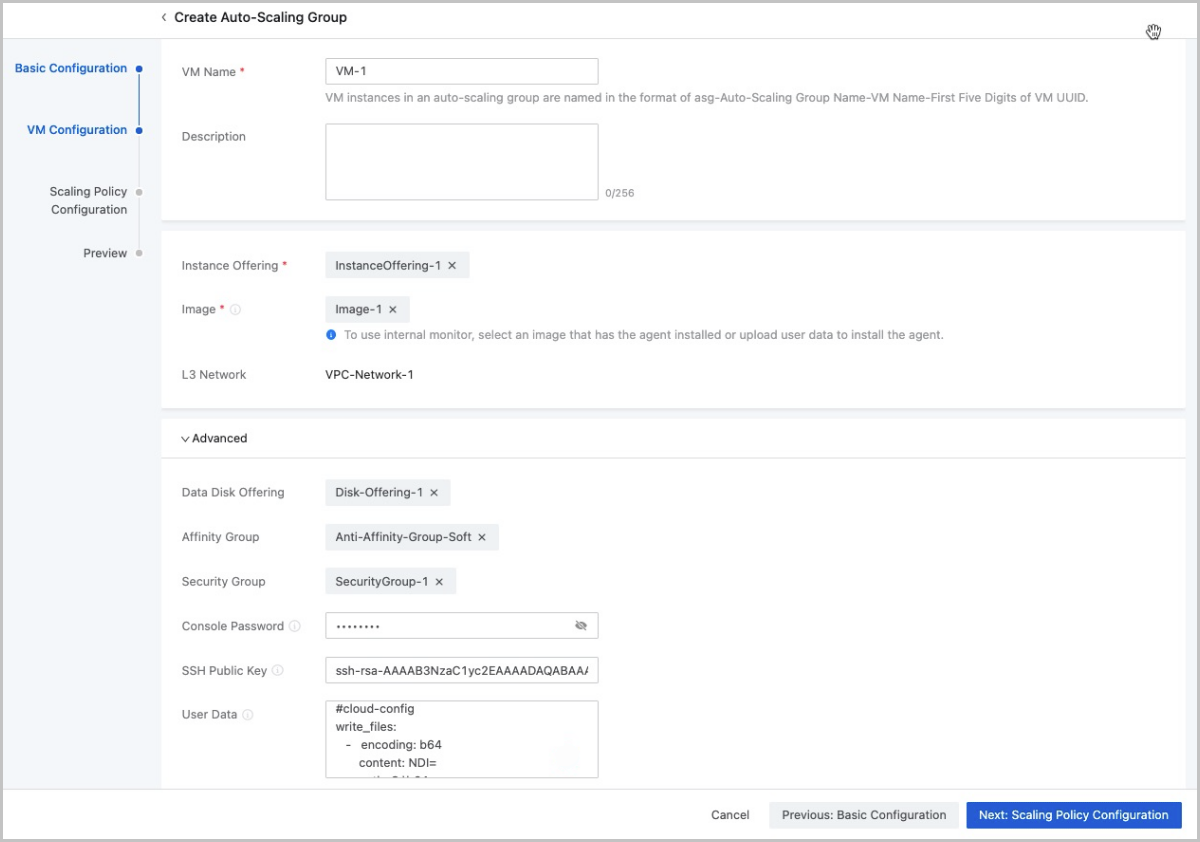
- Complete the VM configuration.To complete this step, set the following parameters:
- VM Name: Enter a name for the VM instance.
- VM instances in an auto-scaling group are named in the format of asg-Auto-Scaling Group Name-VM Name-First Five Digits of VM UUID.
- Description: Optional. Enter a description for the VM instance.
- Instance Offering : Select an instance offering for the VM instance.
- Image: Select an image for the VM instance.
 Note:
Note:
- The image of a VM instance in an auto-scaling group can be in qcow2 or raw format.
- If you want to use the internal monitoring metrics, select either an image with the agent installed, or install the agent manually by using the User Data script.
- If you modify the image after you create a VM instance, the new image will only be effective for the subsequently created VM instances, and the original image remains unchanged for the previously created VM instances.
- L3 Network: The L3 network you selected in the previous step is displayed.
- Advanced:
- Data Disk Offering: Select a data disk offering. The data disk offering can be used to directly create data volumes and then attach them to the VM instance.
- Affinity Group: Select an affinity
group. Currently, only affinity groups with the
anti-affinity group (soft) policy are supported.
 Note:
Note:
- You can see only your own available resources from the tenant's perspective.
- You can disassociate the affinity group from an auto-scaling group on the Actions column of the auto-scaling group.
- Security Group: Select a security group. VM instances in the group share the same security group rules.
- Console Password: Enter a password (VNC password) for the VM console. Password length: 6 to 18 characters.
- SSH Public Key: Inject an SSH public
key into the VM instance. By doing so, you can SSH in to the
VM instance without a password.
- Before you can inject an SSH public key into the VM instance, install cloud-init for the VM image first. Recommended cloud-init version: 0.7.9, 17.1, 19.4, 19.4, and later.
- User Data: Import User Data. You can
upload user-defined parameters or scripts to customize
configurations for VM instances or to accomplish specific
tasks.
- Before you can import User Data to Linux-based VM
instances, install cloud-init for the VM image
first.The following is a sample script of importing User Data to a Linux-based VM instance.
#cloud-config
users:
 - name: test
   shell: /bin/bash
   groups: users
   sudo: ['ALL=(ALL) NOPASSWD:ALL']
   ssh-authorized-keys:
       - ssh-rsa AAAAB3NzaC1LXCJfjroD1lT root@10-0-0-18
bootcmd:
 - mkdir /tmp/temp
write_files:
 - path: /tmp/ZStack_config
   content: |
       Hello,world!
   permissions: '0755'
fqdn: Perf-test
disable_root: false
ssh_pwauth: yes
chpasswd:
  list: |
      root:word
  expire: False
runcmd:
 - echo ls -l / >/root/list.sh
The sample script above can achieve the following functionalities:- When you create a VM instance, create a user with the name test and inject an ssh-key into the VM instance.
- Write the /etc/hosts file when the VM instance is started. Also, create the /tmp/temp directory, create a file under the directory, and write contents into the file.
- Set a hostname, enable the user root, allow the root user SSH log in to the VM instance, and change the root password.
- Run the
echo ls -l /command.
- Before you can import User Data to Windows-based VM
instances, install Cloudbase-Init for the VM image
first. For more information about the installation
method, see Cloudbase-Init
Documentation.The following is a sample script of importing User Data to a Windows-based VM instance.
#cloud-config
write_files:
   -   encoding: b64
       content: NDI=
       path: C:\b64
       permissions: '0644'
   -   encoding: base64
       content: NDI=
       path: C:\b64_1
       permissions: '0644'
   -   encoding: gzip
       content: !!binary |
           H4sIAGUfoFQC/zMxAgCIsCQyAgAAAA==
       path: C:\gzip
       permissions: '0644'
The sample script above can achieve the following functionalities: When the VM instance is started, the b64, b64_1, and gzip files are created in the C drive.
 Note: When you use User Data, note that you can
configure only one L3 network for an L2
network.
 - Before you can import User Data to Linux-based VM
instances, install cloud-init for the VM image
first.
Figure 2. VM Configuration 
 Note: Exercise caution. If you delete resources, such as instance offering,
image, and network from the template configurations, you might fail to
create the auto scaling group.
 - VM Name: Enter a name for the VM instance.
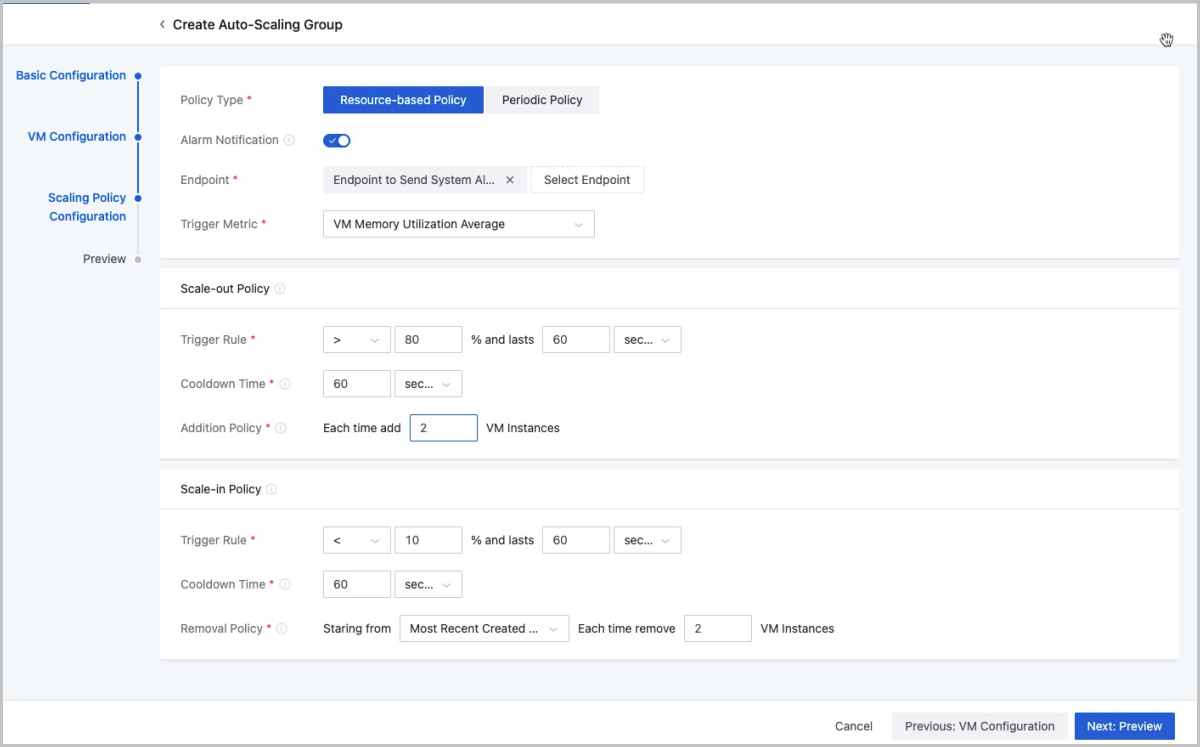
- Complete the scaling policy configuration.The Cloud provides two types of scaling policy: resource-based policy and periodic policy.
- Resource-based Policy: Configure the
scale-out and scale-in policies based on the resource utilization.
This policy type applies to unpredictable user business change
scenarios to increase or decrease VM instances accordingly.
- Alarm Notification: Choose whether to
enable alarm notification. You can configure a monitoring
and alarm mechanism to trigger auto scaling. By default,
alarm notification is not enabled.
- If enabled, you must specify one or more
endpoints.Endpoint: Specify one or more endpoints.
- You can either select the system endpoint (default endpoint) or select a custom endpoint such as email, DingTalk, HTTP application, short message service, and Microsoft Teams.
- If enabled, you must specify one or more
endpoints.
- Trigger Metric: Select a trigger
metric. Available trigger metrics are as follows:
- VM Memory Utilization Average: The sum of the memory utilization for a single VM instance in an auto-scaling group/The total number of VM instances in the auto-scaling group
- VM CPU Utilization Average: The sum of the CPU utilization for a single VM instance in an auto-scaling group/The total number of VM instances in the auto-scaling group
- VM Memory Utilization Average (Agent Required): The sum of the memory utilization for a single VM instance in an auto-scaling group/The total number of VM instances in the auto-scaling group
- VM CPU Utilization Average (Agent Required): The sum of the CPU utilization for a single VM instance in an auto scaling group/The total number of VM instances in the auto scaling group
 Note:
Note:
- We recommend that you use an agent to monitor the average memory utilization of VM instances. By doing so, the monitoring data is more accurate.
- If you must select trigger metrics that require you to install an agent, make sure that you select an image with an installed agent when you create VM instances.
- You can install agents by using the User Data script for Linux-based VM instances. For more information, see the User Data part in this topic.
- If you did not install an agent for internal monitoring and still wanted to select trigger metrics that require you to install the agent, the auto scaling group would fail to take effect.
- Scale-out policy:
- Trigger Rule: Set a
trigger condition and the threshold duration.
- The utilization must be an integer ranging from 1 to 100. Unit: %.
- The threshold duration must be an integer that is greater than 0. Unit: second, minute, and hour.
- Cooldown Time: Set the
cooldown time.
- Cooldown time refers to a period of time during which an auto-scaling group that is in the locked status rejects any new scaling activity after one scaling activity is launched successfully in the auto-scaling group.
- The cooldown time must be an integer that is greater than 0. Unit: second and minute.
- Addition Policy: Enter
the number of VM instances to be added each time
when the auto-scaling group performs a scale-out
activity.
 Note: A minimum number of 1 VM instance
can be added each time during the scale-out
activity. If the value is too large, the scale-out
activity might fail.
- Trigger Rule: Set a
trigger condition and the threshold duration.
- Scale-in policy:
- When workloads decrease, auto-scaling groups automatically scale in to avoid resource waste.
- Auto-scaling groups scale in based on the alarm
rules that you set for the groups.
For example, if the average memory utilization of all VM instances in an auto-scaling group keeps lower than 20% for a period of time, a reasonable number of VM instances are removed. This way, the workloads are well balanced at a reasonable level among the VM instances.
To configure the scale-in policy, set the following parameters:- Trigger Rule: Set a
trigger condition and the threshold duration.
- The utilization must be an integer ranging from 1 to 100. Unit: %. Note that the trigger rule set for the scale-out policy cannot conflict with that for the scale-in policy.
- The threshold duration must be an integer that is greater than 0. Unit: second, minute, and hour.
- Cooldown Time: Set the
cooldown time.
- Cooldown time refers to a period of time during which an auto scaling group that is in the locked status rejects any new scaling activity after one scaling activity is launched successfully in the auto scaling group.
- The cooldown time must be an integer that is greater than 0. Unit: second and minute.
- Removal Policy: Select a
removal policy and enter the number of VM
instances to be removed each time when the
auto-scaling group performs a scale-in activity.
Available removal policies are as follows:
- Most Recent Created VM Instance (default): When the auto-scaling group starts performing scale-in activities, the latest created VM instances are removed successively at first.
- Earliest Created VM Instance: When the auto-scaling group starts performing scale-in activities, the earliest created VM instances are removed successively at first.
- VM with Minimum CPU Usage: When the auto-scaling group starts performing scale-in activities, VM instances with the minimum CPU usage are removed successively at first.
- VM with Minimum Memory Usage: When the auto-scaling group starts performing scale-in activities, VM instances with the minimum memory usage are removed successively at first.
 Note: A minimum number of 1 VM instance can
be removed each time during the scale-in activity.
If the value is too large, the scale-in activity
might fail.
- Alarm Notification: Choose whether to
enable alarm notification. You can configure a monitoring
and alarm mechanism to trigger auto scaling. By default,
alarm notification is not enabled.
- Periodic Policy: Perform scale-out or
scale-in policies periodically. This policy type applies to
predictable user business change scenarios to increase or decrease
VM instances periodically.
- Scale-out policy:
- Scale-out Period: Select a scale-out period. Options: scale-out by month, scale-out by week, scale-out by day, scale-out by hour, and scale-out by minute.
- Execution Time: Configure when the scale-out activity is to be performed.
- Cooldown Time: Set the
cooldown time.
- Cooldown time refers to a period of time during which an auto-scaling group that is in the locked status rejects any new scaling activity after one scaling activity is launched successfully in the auto-scaling group.
- The cooldown time must be an integer that is greater than 0. Unit: second and minute.
- Schedule Effective Time:
Specify the time when the scale-out activity is to
be performed. The auto-scaling group scales out
according to the configured scale-out
period.
 Note: You can set the schedule effective
time when you choose to scale-out by month,
scale-out by week, or scale-out by
day.
 - Addition Policy: Enter the
number of VM instances to be added each time when
the auto-scaling group performs a scale-out
activity.
 Note: A minimum number of 1 VM instance
can be added each time during the scale-out
activity. If the value is too large, the scale-out
activity might fail.
- Scale-in policy:
- Scale-in Period: Select a scale-in period. Options: scale-in by month, scale-in by week, scale-in by day, scale-in by hour, and scale-in by minute.
- Execution Time: Configure when the scale-in activity is to be performed.
- Cooldown Time: Set the
cooldown time.
- Cooldown time refers to a period of time during which an auto-scaling group that is in the locked status rejects any new scaling activity after one scaling activity is launched successfully in the auto-scaling group.
- The cooldown time must be an integer that is greater than 0. Unit: second and minute.
- Schedule Effective Time:
Specify the time when the scale-in activity is to be
performed. The auto-scaling group scales in
according to the configured scale-in
period.
 Note: You can set the schedule effective
time when you choose to scale-in by month,
scale-in by week, or scale-in by day.
 - Removal Policy: Select a
removal policy and enter the number of VM instances
to be removed each time when the auto-scaling group
performs a scale-in activity. Available removal
policies are as follows:
- Most Recent Created VM Instance (default): When the auto-scaling group starts performing scale-in activities, the latest created VM instances are removed successively at first.
- Earliest Created VM Instance: When the auto-scaling group starts performing scale-in activities, the earliest created VM instances are removed successively at first.
- VM with Minimum CPU Usage: When the auto-scaling group starts performing scale-in activities, VM instances with the minimum CPU usage are removed successively at first.
- VM with Minimum Memory Usage: When the auto-scaling group starts performing scale-in activities, VM instances with the minimum memory usage are removed successively at first.
 Note: A minimum number of 1 VM instance can be
removed each time during the scale-in activity. If
the value is too large, the scale-in activity
might fail.
- Scale-out policy:
Figure 3. Scaling Policy Configuration 
- Resource-based Policy: Configure the
scale-out and scale-in policies based on the resource utilization.
This policy type applies to unpredictable user business change
scenarios to increase or decrease VM instances accordingly.
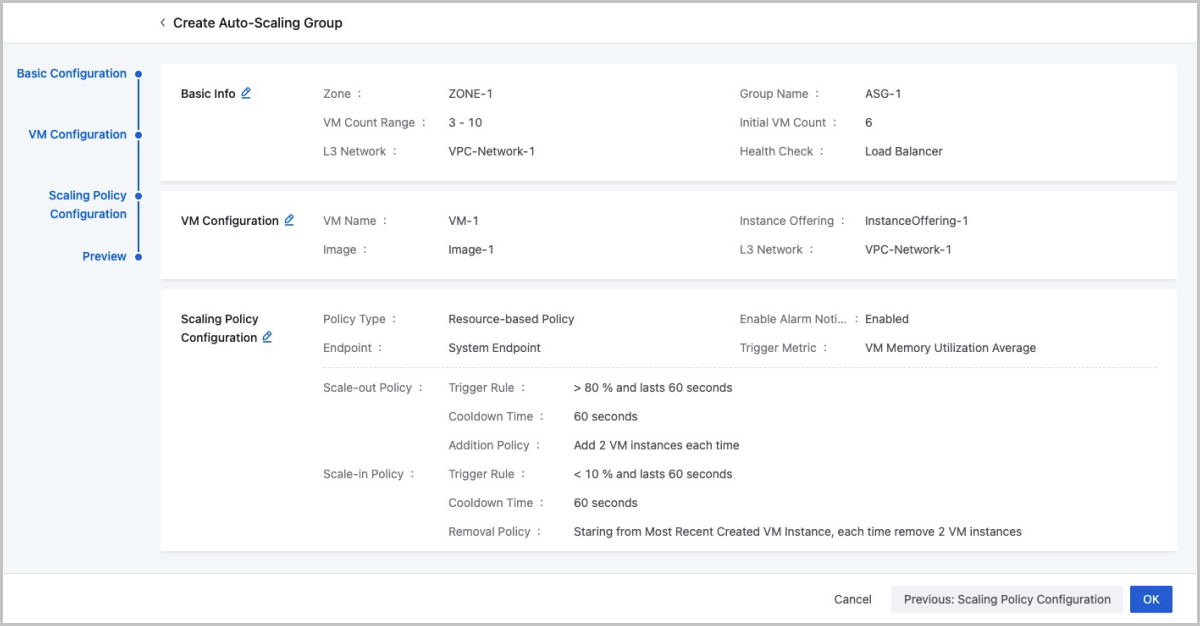
- Preview the configurations.
Preview the configured information about the auto-scaling group. You can modify the configurations by clicking the "Edit" icon.
Figure 4. Preview Configurations 