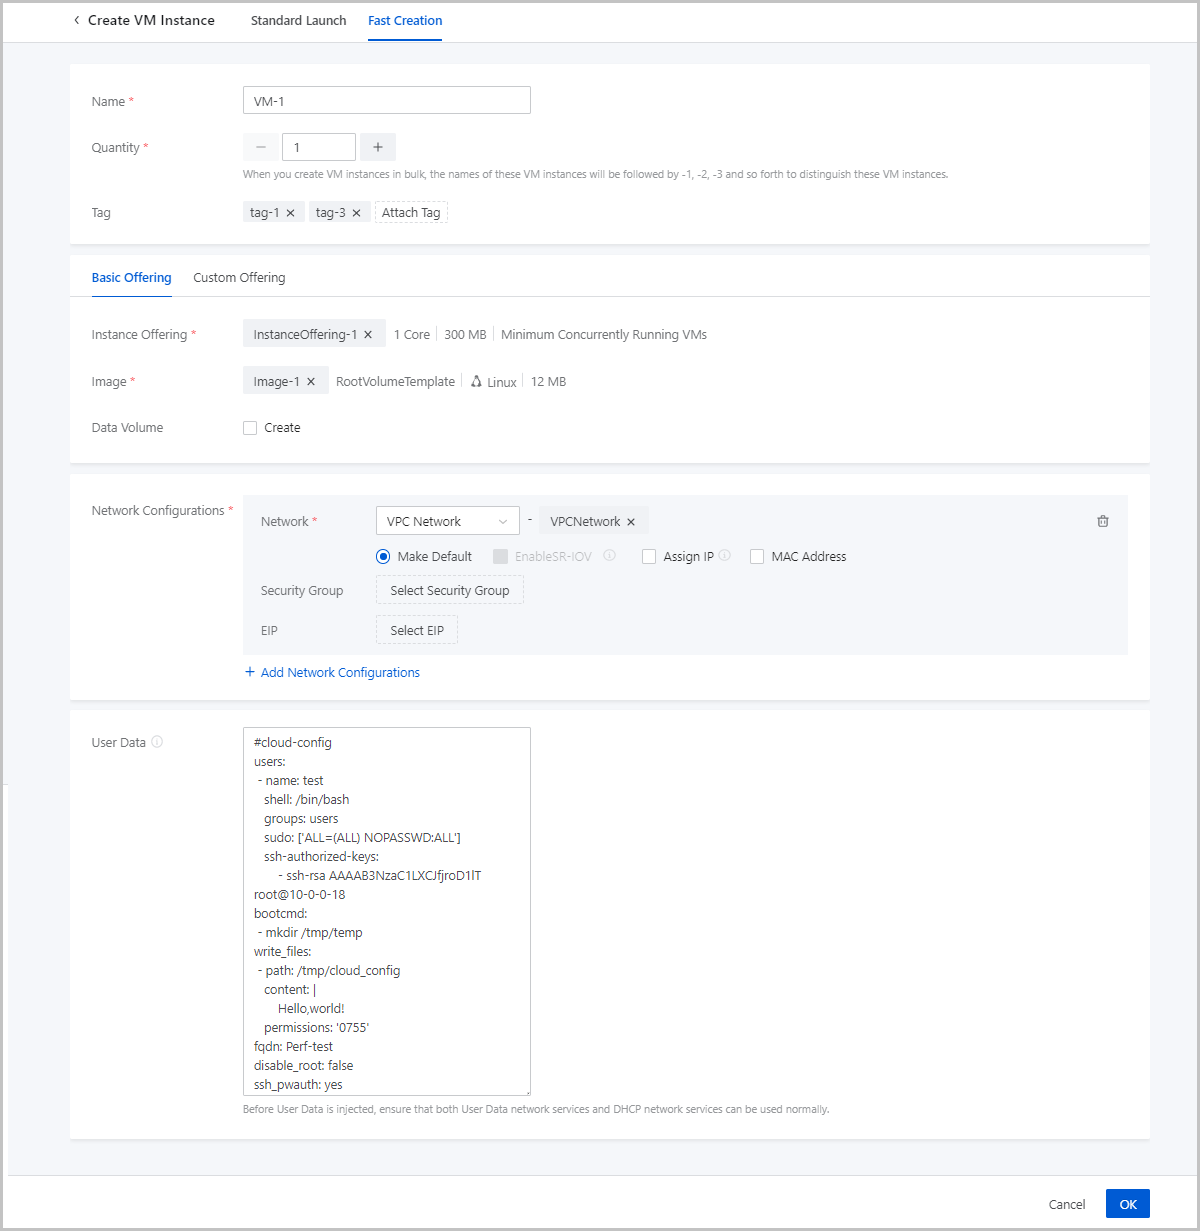
Create a VM Instance (Fast Creation)
On the main menu of ZStack Cloud, choose . You can create a VM instance quickly through one of the following fast
creation entrances:
- Click the Fast Creation button on the right of Create VM Instance. Then, the Fast Creation page is displayed.
- Click Create VM Instance. On the displayed page, click on Fast Creation.
On the Fast Creation tab page, set the following parameters:
- Name: Enter a name for the VM instance. Note that the VM name must be 1 to 128 characters in length and can contain Chinese characters, letters, digits, hyphens (-), underscores (_), periods (.), parenthesis (), colons (:), and plus signs (+).
- Quantity: Enter the number of VM instances to be created.
Valid values: 1 to 100. You can change the maximum number by modifying the value
of Maximum VM Creation in Batch on UI in the global
setting.
 Note: When you create VM instances in bulk, the names of these VM
instances will be followed by -1, -2, -3 and so forth to distinguish these
VM instances.
Note: When you create VM instances in bulk, the names of these VM
instances will be followed by -1, -2, -3 and so forth to distinguish these
VM instances. - Tag: Optional. Bind one or more tags to the VM instance as needed.
- Set the VM offering by using one of the following methods:Basic Offering: Set the VM offering by selecting an existing instance offering and disk offering.
- Instance Offering: Select an existing instance offering. The instance offering defines the number of CPU cores, memory size, host allocation strategy, and other configurations of the VM instance.
- Image: Select an existing image. The image is used to install an operating system for the VM instance.
- Root Disk Offering: Select an existing disk offering for the root volume of the VM instance. The root disk offering defines the root volume information such as the size and disk bandwidth. This parameter appears only when the image type is ISO.
- Data Volume: Optional. Choose whether to
create a data volume and attach it to the VM instance. By default,
no data volumes will be created.If you choose to create a data volume, set the following parameters:
- Data Disk Offering: Select an existing disk offering for the data volume of the VM instance. The data disk offering defines the data volume information such as the volume size and disk bandwidth.
- VirtIO SCSI:
Optional. Choose whether to use a VirtIO SCSI bus to
create a SCSI data volume. SCSI data volumes allow for
multi-queue I/O operations and have worldwide names
(WWNs) as their unique IDs.Note: By default, a VirtIO
SCSI bus is used to create SCSI data volumes for
shared storages. We recommend that you do not create
SCSI data volumes for LocalStorage primary
storages.
Custom Offering: Set the VM offering by customizing the following VM configurations:- CPU: Set the number of CPU cores of the VM instance. Valid values: 1 to 1024, integer.
- Memory: Set the memory size of the VM instance. Valid values: 16 MB to 1000 TB, integer. Unit: MB, GB, and TB.
- Image: Select an existing image. This image is used to install an operating system for the VM instance.
- Root Volume: Set the size of the root volume. Valid values: 1 MB to 1024 TB, integer. Unit: MB, GB, and TB. This parameter appears only when the image type is ISO.
- Data Volume: Optional. Choose whether to
create a data volume with the VM instance. By default, no data
volumes will be created.If you choose to create a data volume, set the following parameters:
- Data Volume Size: Set the size of the data volume. Valid values: 1 MB to 1024 TB, integer. Unit: MB, GB, and TB.
- VirtIO SCSI:
Optional. Choose whether to use a VirtIO SCSI bus to
create a SCSI data volume. SCSI data volumes allow for
multi-queue I/O operations and have worldwide names
(WWNs) as their unique IDs.Note: By default, a VirtIO
SCSI bus is used to create SCSI data volumes for
shared storages. We recommend that you do not create
SCSI data volumes for LocalStorage primary
storages.
- Network Configurations: Configure the networks used by
the VM instance. You can add multiple networks as needed.
- Network: Select an L3 network for the VM instance. Supported network types: VPC network, public network, and flat network.
- Make Default: Set one of the networks as the default network of the VM instance.
- Enable SR-IOV: Optional. Choose whether to use
SR-IOV to generate a VF NIC and pass it through to the VM instance. By
default, SR-IOV is disabled. You can enable it if you have qualified
hardware resources.Note: To enable SR-IOV, note that:
- Make sure that SR-IOV is enabled for the L2 network corresponding to the L3 network of the VM instance. Otherwise, SR-IOV cannot be enabled.
- Enabling SR-IOV generates a VF NIC and passes it through to the VM instance. If not enabled, a vNIC will be assigned to the VM instance.
- Before you enable SR-IOV, make sure that the physical NIC corresponding to the L3 network has an available VF NIC. Otherwise, the VM instance might fail to be created.
- Assign IP: Optional. Choose whether to assign an
IP address to the VM NIC. By default, the Cloud assigns an IP address to
the VM instance through DHCP.Note: To assign an IP address, note
that:
- The IP address must be unique within the network segment of the selected network.
- By default, the drop-down menu displays 5 recommended IP addresses. If the current network has less than 5 IP addresses, all available IP addresses will be displayed.
- If you create VM instances in bulk and assign an IP address here, the Cloud automatically assigns IP addresses to these VM instances with the first assigned IP address as the start IP. If an IP address is occupied or if IP addresses are insufficient within the continuously assigned IP range, the corresponding VM instance will fail to be created.
- If DHCP is not enabled for the L3 network, we recommend that you assign an IP address to the VM instance.
- MAC Address: Optional. Choose whether to customize a MAC address for the VM instance. By default, the Cloud assigns a MAC address to the VM instance.
- Security Group: Optional. Associate a security group with the VM instance.
- EIP: Optional. Associate an elastic IP address (EIP) with the VM instance.
- User Data: Optional. Inject user-defined parameters or
scripts to customize configurations for the VM instance or to accomplish
specific tasks.Note: To use user data, note that:
- Before you import user data, make sure that both the user data network service and DHCP network service work as expected.
- Before you inject user data to Linux-based VM instances, make sure that cloud-init is installed on the images of the VM instances. We recommend that you install cloud-init 0.7.9, 17.1, 19.4, 19.4, or later.
- Before you inject user data to Windows-based VM instances, make sure that Cloudbase-Init is installed on the images of the VM instances. You can install Cloudbase-Init of any version.
- If you set a root user password in user data for a VM instance, the password is displayed in the User Data option on the details page of the VM instance. Make sure that your password is well protected.