Create a VM Instance (Standard Creation)
On the main menu of ZStack Cloud, choose . Click Create VM Instance. On the displayed page, click on Standard Creation.
- Complete the basic configurations.Set the following parameters:
- Name: Enter a name for the VM instance.
- Description: Optional. Enter a description for the VM instance.
- Quantity: Enter the number of VM instances to
be created. You can create VM instances in bulk.
 Note:
Note:
- The quantity must be an integer ranging from 1 to 100.
- You can change the maximum number of VM instances that
you can create by using the following method:
Go to , locate Maximum VM Creation in Batch on UI, and change its value as needed. Default: 100.
- Tag: Optional. Bind one or more tags to the
VM instance.Note:
- The Cloud supports 50 tags per resource and an unlimited number of resources per tag.
- Multiple tags can be bound to multiple resources.
- An administrator can unbind or delete tags created by a tenant.
- An administrator can set the number of tags can be
created by a tenant by using the following method:
Go to , locate Tag Default Quota for Tenant, and change its value as needed. Default: 20.
- Set the VM offering by using one of the following methods:
- Basic Offering: Set the VM offering
by selecting an existing instance offering and disk
offering.
- Instance Offering: Select an existing instance offering.
- Image: Select an existing image.
- Root Disk Offering: Select an existing disk offering for the root volume of the VM instance. This parameter appears only when the image type is ISO.
- Data Volume: Optional. Choose
whether to create a data volume and attach it to the
VM instance. By default, no data volumes will be
created.
- Data Disk Offering: Select an existing disk offering for the data volume.
- VirtIO
SCSI: Optional. Choose whether to
create a SCSI data volume.Note:
- This data volume uses a VirtIO SCSI bus for communication.
- This data volume allows for multi-queue I/O operations. After this data volume is initialized, the system automatically creates a worldwide name (WWN) for the data volume as its unique ID.
- We recommend that you do not create SCSI data volumes for LocalStorage primary storages.
- Custom Offering: Set the VM offering
by customizing the following VM configurations:
- CPU: Set the number of CPU cores of the VM instance. Valid values: 1 to 1024, integer.
- Memory: Set the memory size of the VM instance. Valid values: 16 MB to 1000 TB, integer. Unit: MB, GB, and TB.
- Image: Select an existing image.
- Root
Volume: Set the size of the root
volume. This parameter appears only when the image
type is ISO.
Valid values: 1 MB to 1024 TB, integer. Unit: MB, GB, and TB.
- Data Volume: Choose whether
to create a data volume and attach it to the VM
instance.
- Data Volume Size: Set the size of the data volume. Valid values: 1 MB to 1024 TB, integer. Unit: MB, GB, and TB.
- VirtIO
SCSI: Optional. Choose whether to
create a SCSI data volume.Note:
- This data volume uses a VirtIO SCSI bus for communication.
- This data volume allows for multi-queue I/O operations. After this data volume is initialized, the system automatically creates a worldwide name (WWN) for the data volume as its unique ID.
- We recommend that you do not create SCSI data volumes for LocalStorage primary storages.
- Basic Offering: Set the VM offering
by selecting an existing instance offering and disk
offering.
- Advanced:
- HA Mode: Optional. Choose a high
availability (HA) mode for the VM instance.Note:
- You can enable or disable the VM HA feature in
the Cloud by using the following method:
Go to , locate Enable VM HA Globally, and enable or disable the switch as needed. Default: true.
- The HA switch of a single VM instance is strictly controlled by that in the global setting.
- If you disable the switch in the global setting, you cannot set HA mode for a VM instance on the VM details page. In this case, the VM business may not be protected by HA. Please exercise caution.
- You can enable or disable the VM HA feature in
the Cloud by using the following method:
- Time Sync: Optional. Choose whether
to synchronize the VM time with the host time. If yes, the
time of the VM instance is the same as that of the host. The
time sync feature is enabled by default.Note: If the VM
instance is running or paused, restart the VM instance
to make the setting take effect.
- Resource Priority: Optional. Set a
high resource priority for the VM instance so that VM
instance can compete for more resources in case of resource contention.Note:
- When resource contention occurs due to high host workloads, priority is given to allocating resources to VM instances with the high resource priority.
- We recommend that you set a high resource priority for vital VM instances.
- Affinity Group: Optional. Select an
affinity group for the VM instance. You can set the affinity
group policy for the VM instance as needed. Valid affinity
group policies: anti-affinity group (soft) and anti-affinity
group (hard).
- Anti-affinity group (soft):
Allocates VM instances in the affinity group to different hosts as much as possible. If no more hosts are available, the VM instances will be allocated randomly.
- Anti-affinity group (hard):
Strictly allocates VM instances in the affinity group to different hosts. If no more hosts are available, the allocation fails.
- Anti-affinity group (soft):
- USB Redirection: Optional. Set USB
redirection for the VM instance.Note:
- The Cloud currently supports redirection of multiple USB devices. If you want to use the VDI feature, you can redirect the USB device on the VDI client to the VDI VM instance.
- The setting takes effect after you restart the VM instance.
- Anti-Spoofing Mode: Optional. Enable
the anti-spoofing mode for the VM instance.Note:
- This mode provides IP/MAC anti-spoofing and ARP anti-spoofing for the VM instance. If enabled, the VM instance can only communicate with outside networks by using the IP or MAC addresses allocated by the Cloud.
- You can set whether to enable the anti-spoofing
mode globally by using the following method:
Go to , locate IP/MAC Anti-Spoofing, and enable or disable the switch as needed. Default: false.
- By default, the anti-spoofing mode of a single VM instance is strictly controlled by that in the global setting.
- If anti-spoofing is disabled in the global setting, you can enable it for a single VM instance on the VM details page.
- HA Mode: Optional. Choose a high
availability (HA) mode for the VM instance.
Figure 1. Basic Configurations 
- Complete the resource configurations.Set the following parameters:
- Network Configurations: Select an L3 network
used by the VM instance and complete the network configurations.
- Network: Select an L3 network used by
the VM instance. Supported network types: public network,
flat network, and VPC network.Note: When you select an L3
network, note that:
- A VM instance can have multiple networks attached, and each L3 network corresponds to a NIC.
- If the selected L3 network has both an IPv4 and IPv6 address, the VM instance would have a dual-stack NIC. That is, the VM NIC has both an IPv4 and IPv6 address.
- Before you can create a VM instance by using an IPv6 or IPv4+IPv6 network, obtain the IP address by using dhclient -6 NIC_NAME.
- We recommended that you use only one IPv6 address for VM instances to avoid potential risks.
- Make Default: If you add multiple network configurations, set one of the networks as the default network.
- Enable SR-IOV:
Optional. Choose whether to use SR-IOV to generate a VF NIC
and pass it through to the VM instance.
- By default, SR-IOV is not enabled. In this case, the VM instance that you created will have a vNIC attached.
- If enabled, the VM instance that you created will have a VF NIC attached.
Note: To enable SR-IOV, note that:- Only IPv4 networks support SR-IOV, but IPv6 or IPv4+IPv6 networks do not.
- Make sure that SR-IOV is enabled for the L2 network corresponding to the L3 network of the VM instance. Otherwise, SR-IOV cannot be enabled.
- After SR-IOV is enabled, make sure that the physical NIC corresponded by the L3 network has an available VF NIC. Otherwise, the VM instance might fail to be created.
- If SR-IOV is enabled, NICs of the VM instances that were created by using a public network or a flat network do not support the network services such as security group and EIP. If the VM instances were created by using a VPC network, their NICs do not support the security group network services.
- Assign IP:
Optional. Choose whether to assign an IP address to the VM
NIC.
- The Cloud assigns an IP address to the VM instance by default.
- If you choose to assign an IP address to the VM
instance, set the following parameters:
- Assign IPv4: Assign an IPv4 address to the VM instance.
- Assign IPv6: Assign an IPv4 address to the VM instance.
Note:
- If you use the custom configuration, the Cloud assigns an IP address to the VM instance according to your configurations. In this case, pay attention to avoid IP address conflicts.
- If you create VM instances in bulk and choose to assign an IP address here, the Cloud automatically assigns IP addresses to these VM instances with the first assigned IP address as the start address. If an IP address is occupied or if IP addresses are insufficient within the continuously assigned IP range, the corresponding VM instance will fail to be created.
- MAC Address: Optional. Choose whether
to configure a MAC address for the VM instance.
- By default, the Cloud assigns a MAC address to the VM instance.
- If you choose to configure a MAC address, set the
following parameters:
- MAC Address: Customize a MAC address for the VM instance.
-
Note:
- If you use the custom configuration, the Cloud assigns a MAC address to the VM instance according to your configurations. In this case, pay attention to avoid MAC address conflicts.
- If you create VM instances in bulk and choose to assign a MAC address here, the Cloud automatically assigns MAC addresses to these VM instances with the first assigned MAC address as the start address. If a MAC address is occupied within the continuously assigned MAC range, the corresponding VM instance will fail to be created.
- Security Group: Optional. Associate a
security group with the VM instance.
The security group is used to better protect the VM instance by implementing access control in the group. You can customize access rules in the security group. These rules take effect immediately when the VM instance joins the security group. This protects the VM instance in real time.
- EIP: Optional. Associate an elastic
IP address (EIP) with the VM instance.Note: This parameter
does not appear if you selected a public
network.
- Network: Select an L3 network used by
the VM instance. Supported network types: public network,
flat network, and VPC network.
- Cluster: Optional. Specify a cluster for the host on which the VM instance is to be started.
- Storage Allocation Policy: Specify how the
Cloud allocates a primary storage.Note:
- System allocation: The Cloud allocates a primary storage according to the preconfigured policy.
- Manual allocation: You can select a primary storage as needed.
- If you select System
Allocation, set the following parameters:
- Host: Optional. Select the host on which the VM instance is to be started. If you specified a cluster, select a host from the cluster.
- vDrive:
Optional. Add a virtual drive (vDrive) for the VM
instance.You can click Add vDrives to create more vDrives. Then, you can click Select ISO to attach an ISO to a vDrive.
-
- If you select a qcow2 image or raw image, the Cloud creates an empty vDrive by default. To delete a vDrive, click the delete icon next to the vDrive parameter.
- If you select an ISO image, the Cloud creates a vDrive by default and attaches the ISO image to the vDrive. Note that this vDrive cannot be deleted here.
- You can set the maximum number of vDrives for
a VM instance after stopping the VM instance. The
method is as follows:
Go to , locate Maximum Virtual Drive, and change its value as needed. Default: 3. Valid values: 1, 2, and 3.
-
- GPU: Add a
GPU device for the VM instance by specifying a GPU
specification or device. The GPU device can be
either a physical GPU (pGPU) or a virtual GPU
(vGPU).
- Load GPU Specification: Allocate a CPU device according to the selected specification when you create a VM instance.
- Auto
Detach GPU Device: Choose whether to
uninstall a GPU device automatically after the VM
instance is stopped.
- If a pGPU specification is used, this option is not selected by default. If a vGPU specification is used, this option is selected by default.
- If selected, the GPU device will be automatically uninstalled after the VM instance is stopped. When the VM instance is restarted, a new GPU device will be allocated to the VM instance according to the GPU specification.
- If not selected, the GPU device will be retained after the VM instance is stopped. When the VM instance is restarted, the existing GPU device will be used.
- Load GPU Device: Attach the GPU device you selected when you create a VM instance.
Note: - You can attach multiple pGPU devices or only one vGPU device to a VM instance at a time.
- You cannot attach both pGPU and vGPU devices to a VM instance at the same time.
- You can attach GPU devices to a VM instance from the host where the VM instance is located. Currently, you cannot attach GPU devices to a VM instance across hosts.
- CPU
Pinning: Specify the association between
the pCPU of the host and the vCPU of the VM
instance. Then, the Cloud allocates a pCPU to the VM
instance accordingly. This helps to improve the VM
performance.
- You can click Add CPU Pinning to specify more CPU pinning policies.
- Enter the vCPU range in the left text box and
the pCPU range in the right. Note that the
- symbol indicates the value range, while
the ^ symbol indicates that a value is not
included. If you specify multiple rules in a
policy, separate each rule by using a comma (,).
The following are some examples:
- 0-2 indicates CPU 0, CPU 1, and CPU 2.
- ^2 indicates that CPU 2 is not included.
- 0-2,^2 indicates CPU 0 and CPU 1.
- 1-7,^2,^3,^4,10 indicates CPU 1, CPU 5, CPU 6, CPU 7, and CPU 10.
Note:
- The vCPU range depends on the selected instance offering of the VM instance, while the pCPU range depends on the selected cluster or the number of pCPUs of the selected host.
- If a vCPU has multiple CPU pinning policies, the union of the policies is used.
- ZStack Cloud supports CPU overcommitment. Therefore, the number of vCPUs can be greater than that of pCPUs. However, if the number of vCPUs specified in the CPU pinning policy is greater than that of pCPUs, the VM performance will be affected. Therefore, CPU overcommitment is not recommended.
- You can modify the CPU pinning policy on the Overview tab page of a VM details page. The modification takes effect after you restart the VM instance.
- Cloning or migrating a VM instance also copies the CPU binding policy, while creating a VM image or performing VM backup does not.
- When you create a VM instance, the Cloud firstly checks the affinity group and host allocation strategies, and then checks the CPU pinning policy.
- When you power off a VM instance to modify its instance offering and reduce its CPU, the invalid CPU pinning policy will not take effect. In this case, we recommend that you modify or delete this policy.
- If you select Manual Allocation, set
the following parameters:
- Primary Storage: Select a primary storage for the VM instance.
-
- Host: Optional. Select the host on which the VM instance is to be started. If you specified a cluster, select a host from the cluster.
- vDrive:
Optional. Add a virtual drive (vDrive) for the VM
instance.You can click Add vDrives to create more vDrives. Then, you can click Select ISO to attach an ISO to a vDrive.
-
- If you select a qcow2 image or raw image, the Cloud creates an empty vDrive by default. To delete a vDrive, click the delete icon next to the vDrive parameter.
- If you select an ISO image, the Cloud creates a vDrive by default and attaches the ISO image to the vDrive. Note that this vDrive cannot be deleted here.
- You can set the maximum number of vDrives for
a VM instance after stopping the VM instance. The
method is as follows:
Go to , locate Maximum Virtual Drive, and change its value as needed. Default: 3. Valid values: 1, 2, and 3.
-
- GPU: Add a
GPU device for the VM instance by specifying a GPU
specification or device. The GPU device can be
either a physical GPU (pGPU) or a virtual GPU
(vGPU).
- Load GPU Specification: Allocate a CPU device according to the selected specification when you create a VM instance.
- Auto
Detach GPU Device: Choose whether to
uninstall a GPU device automatically after the VM
instance is stopped.
- If a pGPU specification is used, this option is not selected by default. If a vGPU specification is used, this option is selected by default.
- If selected, the GPU device will be automatically uninstalled after the VM instance is stopped. When the VM instance is restarted, a new GPU device will be allocated to the VM instance according to the GPU specification.
- If not selected, the GPU device will be retained after the VM instance is stopped. When the VM instance is restarted, the existing GPU device will be used.
- Load GPU Device: Attach the GPU device you selected when you create a VM instance.
Note: - You can attach multiple pGPU devices or only one vGPU device to a VM instance at a time.
- You cannot attach both pGPU and vGPU devices to a VM instance at the same time.
- You can attach GPU devices to a VM instance from the host where the VM instance is located. Currently, you cannot attach GPU devices to a VM instance across hosts.
- CPU
Pinning: Specify the association between
the pCPU of the host and the vCPU of the VM
instance. Then, the Cloud allocates a pCPU to the VM
instance accordingly. This helps to improve the VM
performance.
- You can click Add CPU Pinning to specify more CPU pinning policies.
- Enter the vCPU range in the left text box and
the pCPU range in the right. Note that the
- symbol indicates the value range, while
the ^ symbol indicates that a value is not
included. If you specify multiple rules in a
policy, separate each rule by using a comma (,).
The following are some examples:
- 0-2 indicates CPU 0, CPU 1, and CPU 2.
- ^2 indicates that CPU 2 is not included.
- 0-2,^2 indicates CPU 0 and CPU 1.
- 1-7,^2,^3,^4,10 indicates CPU 1, CPU 5, CPU 6, CPU 7, and CPU 10.
Note:
- The vCPU range depends on the selected instance offering of the VM instance, while the pCPU range depends on the selected cluster or the number of pCPUs of the selected host.
- If a vCPU has multiple CPU pinning policies, the union of the policies is used.
- ZStack Cloud supports CPU overcommitment. Therefore, the number of vCPUs can be greater than that of pCPUs. However, if the number of vCPUs specified in the CPU pinning policy is greater than that of pCPUs, the VM performance will be affected. Therefore, CPU overcommitment is not recommended.
- You can modify the CPU pinning policy on the Overview tab page of a VM details page. The modification takes effect after you restart the VM instance.
- Cloning or migrating a VM instance also copies the CPU binding policy, while creating a VM image or performing VM backup does not.
- When you create a VM instance, the Cloud firstly checks the affinity group and host allocation strategies, and then checks the CPU pinning policy.
- When you power off a VM instance to modify its instance offering and reduce its CPU, the invalid CPU pinning policy will not take effect. In this case, we recommend that you modify or delete this policy.
Figure 2. Resource Configurations 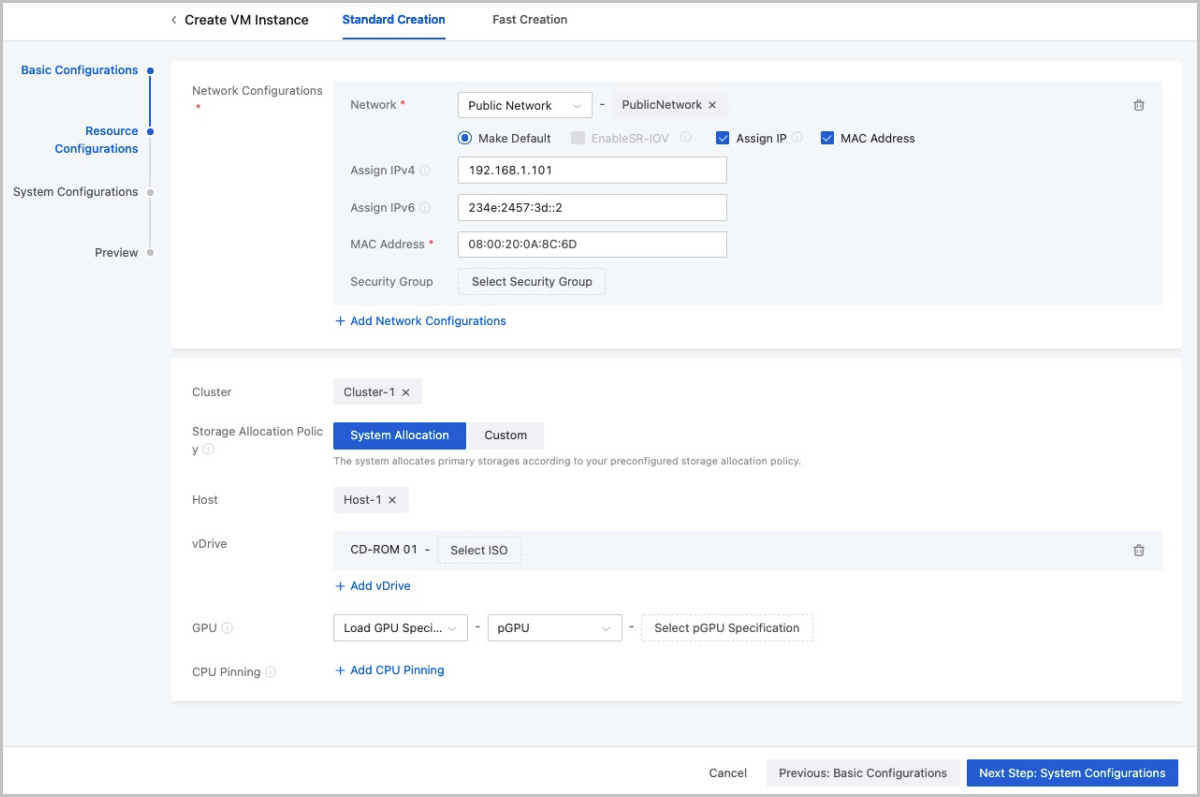
- Network Configurations: Select an L3 network
used by the VM instance and complete the network configurations.
- Complete the system configurations.Set the following parameters:
- Set the SSH login mode to either of the following methods:
- SSH Login
Mode: Select SSH Public
Key.Note: If
cloud-init is installed in your VM image, you can log in
to your VM instance by using an SSH public key or a
password.
- SSH Public Key: After an SSH key is injected to your VM instance, you can SSH in to the VM instance without entering a password when the VM instance is running.
- SSH Login
Mode: Select Password.
- User Name: The default user name is root.
- Password: After a root password is injected to your VM instance, you can SSH in to the VM instance by entering a password when the VM instance is running.
Note:
- The root password setting method only applies to Linux VM instances. For Windows VM instances, you can set passwords by using User Data.
- Before you set the password, make sure that the VM image has the cloud-init installed. Recommended versions for cloud-init: 0.7.9, 17.1, 19.4, and later.
- After you set a password, do not set the password again in User Data to avoid conflicts.
- After you set a root password, a clear text password will be displayed in the User Data on the details page of the VM instance. Keep your password confidential.
Note: The SSH login method
varies according to the types of images.- Images of different operating systems:
- Linux image: Use root as the user name. Supported SSH login methods: SSH key and password.
- Windows image: Use administrator as the user name. Supported SSH login method: setting password by using User Data.
- Images of different formats:
- Image of the ISO type: Supports the SSH key login method only.
- Image of the Image type: Supports both SSH key and password login methods.
- SSH Login
Mode: Select SSH Public
Key.
- Hostname: Set a
hostname for the VM instance.
- The rules for setting Linux hostname and Windows hostname
are different.
- Linux hostname: The hostname must be 2 to 60 characters in length, and can be uppercase, lowercase, digits, and hyphens (-). Note that a hostname cannot contain consecutive hyphens (-) and cannot start or end with hyphens (-).
- Windows hostname: The hostname must be 2 to 15 characters in length, and can be uppercase, lowercase, digits, and hyphens (-). Note that a hostname cannot contain consecutive hyphens (-), cannot start or end with hyphens (-), and cannot contain only digits.
- To set a hostname, make sure that the DHCP service of the corresponding L3 network is enabled.
- For Linux images, the hostname must be set to localhost.localdomain.
- After you set a hostname, do not set it again in User Data to avoid conflicts.
- The rules for setting Linux hostname and Windows hostname
are different.
- User Data:
Optional. Inject user-defined parameters or scripts to customize
configurations for the VM instance or to accomplish specific
tasks.
- Before you import user data, make sure that both the user data network service and DHCP network service work as expected.
- By default, the user data network service and DHCP network service in the flat network and VPC network environments are enabled.
- If you set a hostname and password by using the user data, do not set them again in SSH Login Method to avoid conflicts.
- After you set a root password by using the user data, a clear text password will be displayed in the User Data field on the details page of the VM instance. Keep your password confidential.
- When you import user data to a Linux VM instance, note the
following:
- Make sure that cloud-init is installed on the images of the VM instance. We recommend that you install cloud-init 0.7.9, 17.1, 19.4, 19.4, or later.
- If you create a Linux VM instance by using a VM image that has cloud-init installed, you must import the user data. Otherwise, the cloud-init task will wait until the task times out.
- The following is an example of importing user data
to a Linux VM
instance.
#cloud-config
users:
 - name: test
   shell: /bin/bash
   groups: users
   sudo: ['ALL=(ALL) NOPASSWD:ALL']
   ssh-authorized-keys:
       - ssh-rsa AAAAB3NzaC1LXCJfjroD1lT root@10-0-0-18
bootcmd:
 - mkdir /tmp/temp
write_files:
 - path: /tmp/ZStack_config
   content: |
       Hello,world!
   permissions: '0755'
fqdn: Perf-test
disable_root: false
ssh_pwauth: yes
chpasswd:
  list: |
      root:word
  expire: False
runcmd:
 - echo ls -l / >/root/list.sh
The preceding script can do the following:- Create a user named test and use ssh-key when a VM instance is created.
- Write the /etc/hosts file when the VM instance is started, create a directory named /tmp/temp, create a file, and write data to the file.
- Set a hostname, enable the root user, enable SSH login with password, and change the root password.
- Run the
echo
                                                  ls -l /
command.
- When you import user data to a Windows VM instance, note the
following:
- Cloudbase-Init must be installed for the VM image. The version of the Cloudbase-Init is not enforced. For information about how to install Cloudbase-Init, see Cloudbase Documentation.
- If you create a Windows VM instance by using a VM image that has Cloudbase-Init installed, you must import the user data. Otherwise, the Cloudbase-Init task will wait until the task times out.
- The following is an example of importing user data
to a Windows VM
instance.
#cloud-config
write_files:
   -   encoding: b64
       content: NDI=
       path: C:\b64
       permissions: '0644'
   -   encoding: base64
       content: NDI=
       path: C:\b64_1
       permissions: '0644'
   -   encoding: gzip
       content: !!binary |
           H4sIAGUfoFQC/zMxAgCIsCQyAgAAAA==
       path: C:\gzip
       permissions: '0644'
The preceding script can do the following:- Create b64, b64_1, and gzip files under C drive when the VM instance is started.
Note: When you use the user data, you
can configure only one L3 network to an L2 network. - Console Password:
Set a console password for the VM instance.
The password must be 6 to 18 characters long.
- Console Mode: Set the console mode. Options: VNC, SPICE, and VNC+SPICE. Default: VNC.
Figure 3. System Configurations 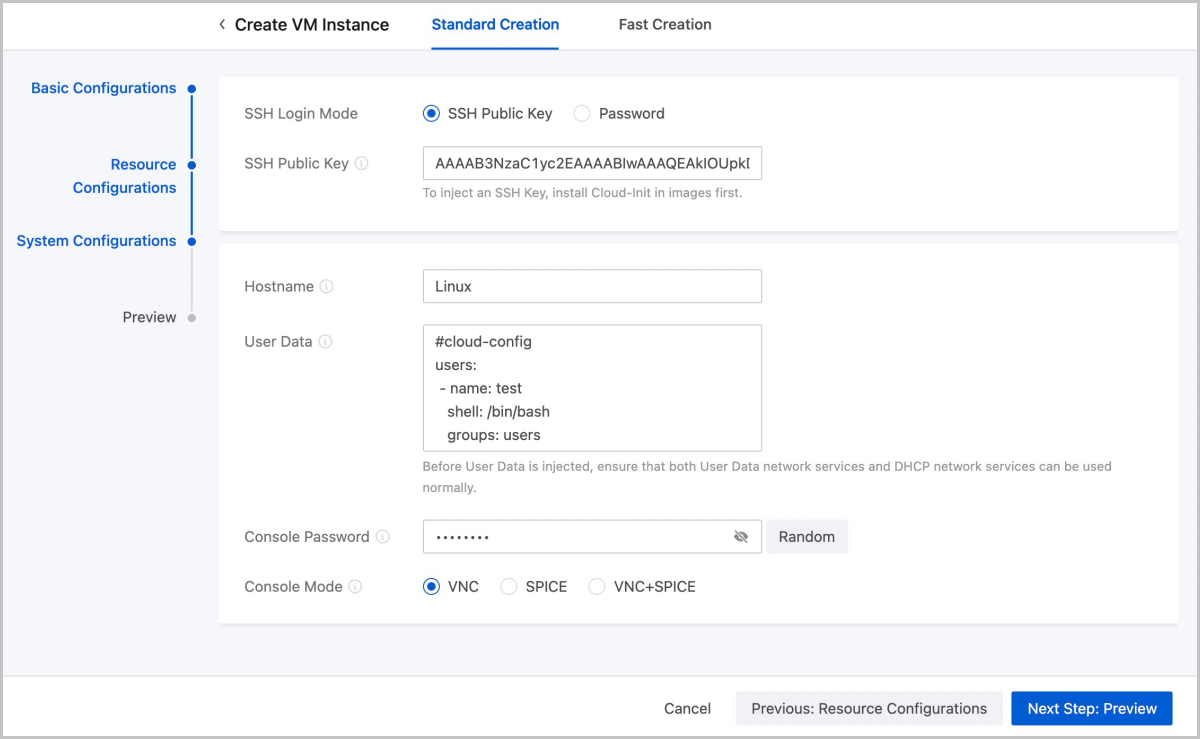
- Set the SSH login mode to either of the following methods:
- Confirm the information.
View the information about the VM instance. You can edit the information by clicking the Edit icon.
Figure 4. Confirm Information 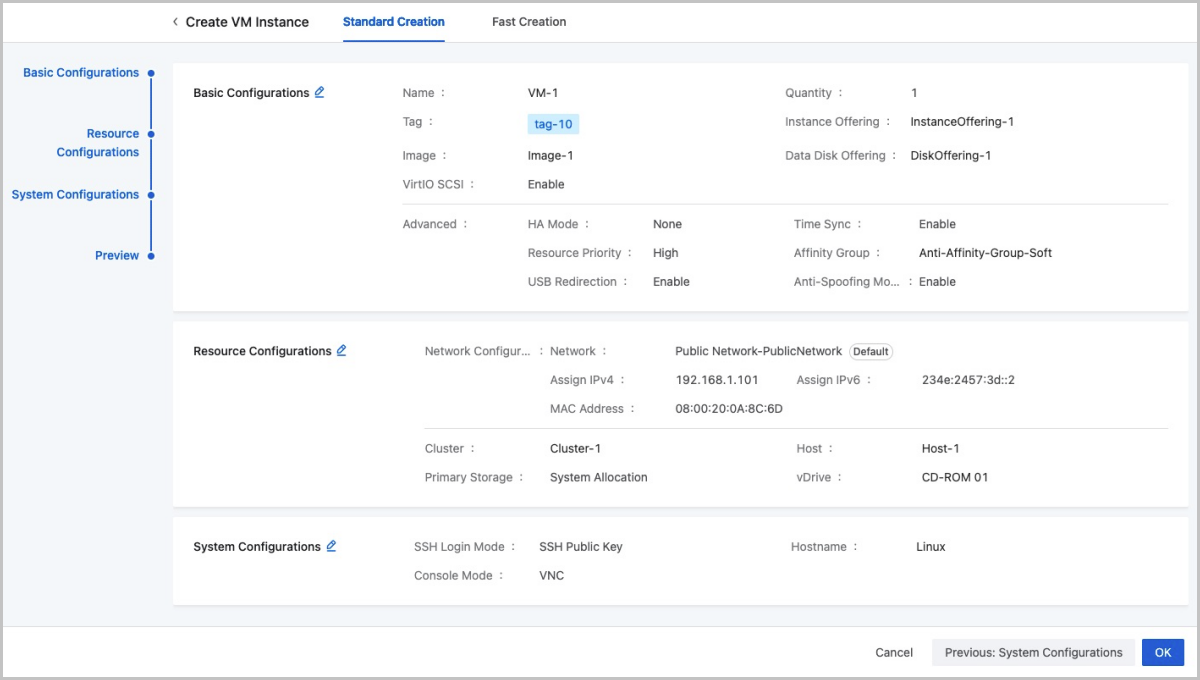
Considerations
-
- The image BIOS mode includes Legacy and UEFI. A VM instance inherits the BIOS mode of the image added to the VM instance.
- You need to get the corresponding image ready, and select a proper BIOS mode.
- You can change the BIOS mode on the VM details page. Exercise caution when you make any changes. The VM instance may fail to work properly if the BIOS mode does not match the VM instance. After you change the BIOS mode, restart the VM instance for the changes to take effect.
- The Legacy mode is recommended when you create a VM instance. If you
want to use the UEFI mode, we recommend that you select the
corresponding image from the following list of operating system
versions.
OS BIOS Mode Supported Versions Windows UEFI - Windows 8 or later
UEFI with CSM - Windows 7
- Windows Server 2008 R2
Linux UEFI - CentOS 7.2
- CentOS 7.3
- CentOS 7.4 or later