Resize the Root Volume
ZStack Cloud allows you to resize the root volume of a VM instance when the VM instance is in the running or stopped state. Note that only increasing volume size is supported.
Resize the Root Volume
- On the VM Instance management page, select a VM
instance that is in the running or stopped state and choose . Then, the Resize Root Volume dialog box
is displayed.You can set a new size as needed. The new size takes effect immediately.
Figure 1. Resize Root Volume 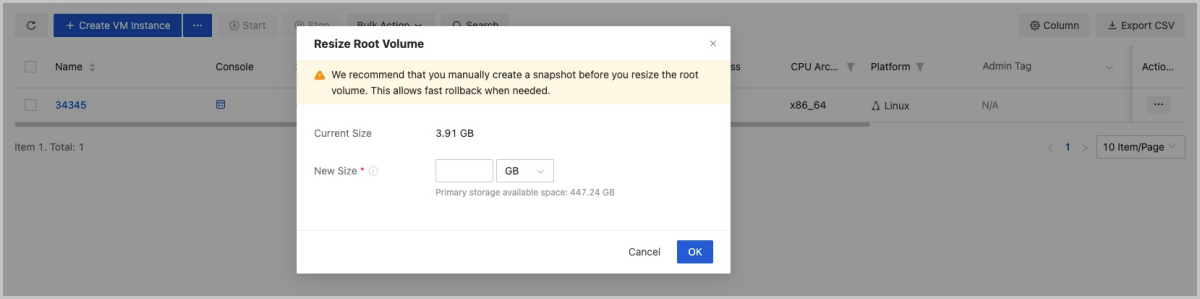
- Select a VM instance that is in the running or stopped state and go to the
details page of the VM instance. On the Configuration
Info tab page, select the root volume to be resized and
choose . Then, the Resize Volume dialog box is
displayed.You can set a new size as needed. The new size takes effect immediately.
Figure 2. Resize Volume 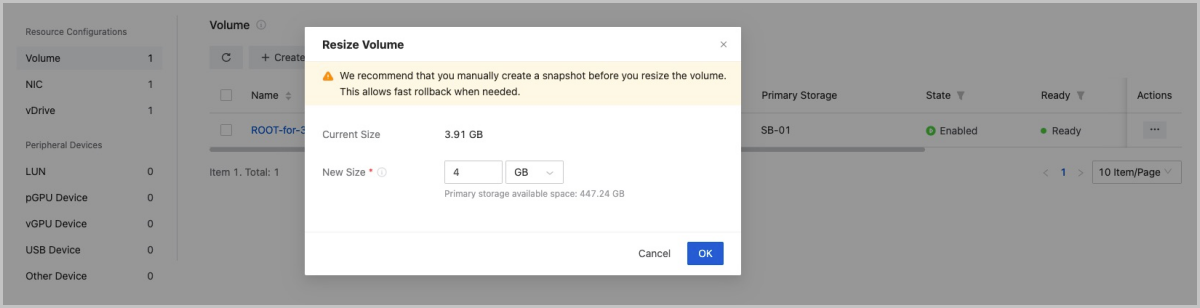
- Select a VM instance that is in the running or stopped state and go to the details page of the VM instance. On the Configuration Info tab page, click on the name of the root volume to be resized and set a new size for the root volume. The new size takes effect immediately.
The steps above only increase the size of the root volume. To make the new size recognized by the VM instance, partition and resize the hard disk in the operating system of the VM instance.
Partition and Resize the Hard Disk
 Note:
Note:
- Before you resize a root volume, create a snapshot for the VM instance to enhance the data security.
- The resize operation has potential risks. For security reasons, we recommend that you plan a new partition for the new size.
- The resize operation only increases the size, not reduce the size.
- The increased size can be merged into the last partition for continuous
use.
- If the last partition is a system backup partition (Windows), you must plan a new partition for the increased size.
- If the last partition is a swap partition, you can delete the swap partition first, add the increased size to the last partition, and then rebuild a swap partition.
The following are four different resize scenarios.
- Use the GParted open source tool to resize the ext4 root partition for an
instance that has both the ext4 and swap partitions.Note:
- In this scenario, you need to re-plan the current partition by using Live CD.
- To prevent data loss, exercise caution when you adjust a partition.
Assume that VM instance uses an ext4 root partition of 35 GB and a swap partition of 5 GB. The total size is 40 GB. After you resize the root volume from 40 GB to 50 GB, you want to add the increased size to the ext4 root partition.
Procedure:- Add a GParted ISO. You can download the ISO from the GParted official website https://gparted.org/download.php. We recommend that you download the amd64 iso, indicating that 64-bit operating systems are supported.
- After you add the ISO, set CD ROM as the first boot order and Hard Disk as the second. Then, the VM instance boots from CD ROM next time.
- Use GParted Live CD to boot the system and launch the console of the VM instance. After the GParted boot finished, follow the instructions and long-press the Enter key until you enter the graphical interface.
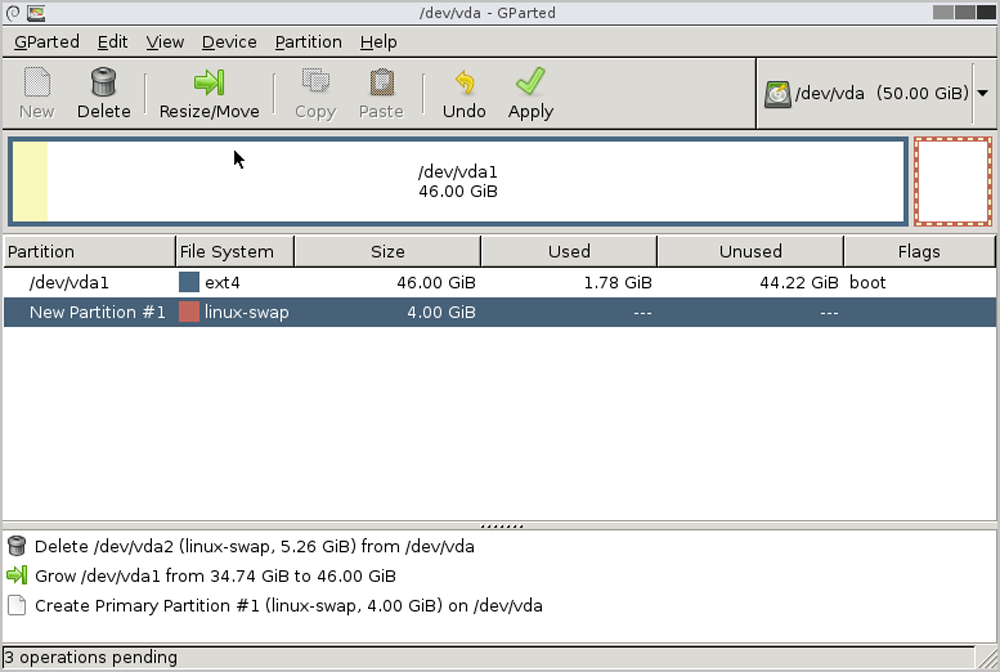
- In the GParted interface, right-click the original swap partition to
delete it, resize ext4 from 35 GB to 46 GB, and create a new swap
partition for the unallocated 4 GB.
Figure 3. Delete Original swap Partition 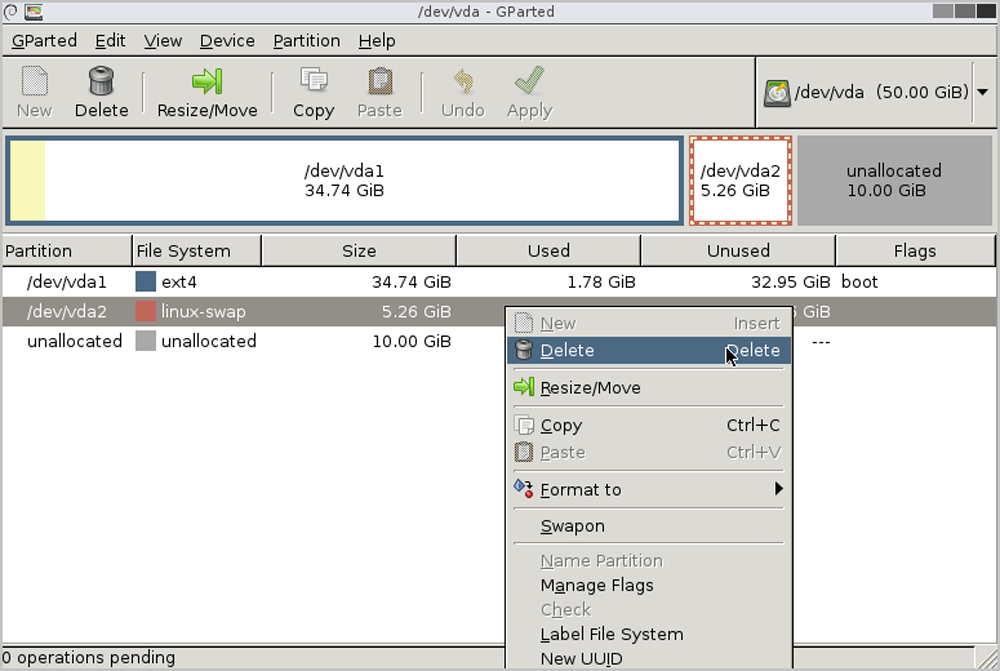
Figure 4. Resize ext4 from 35 GB 46 GB 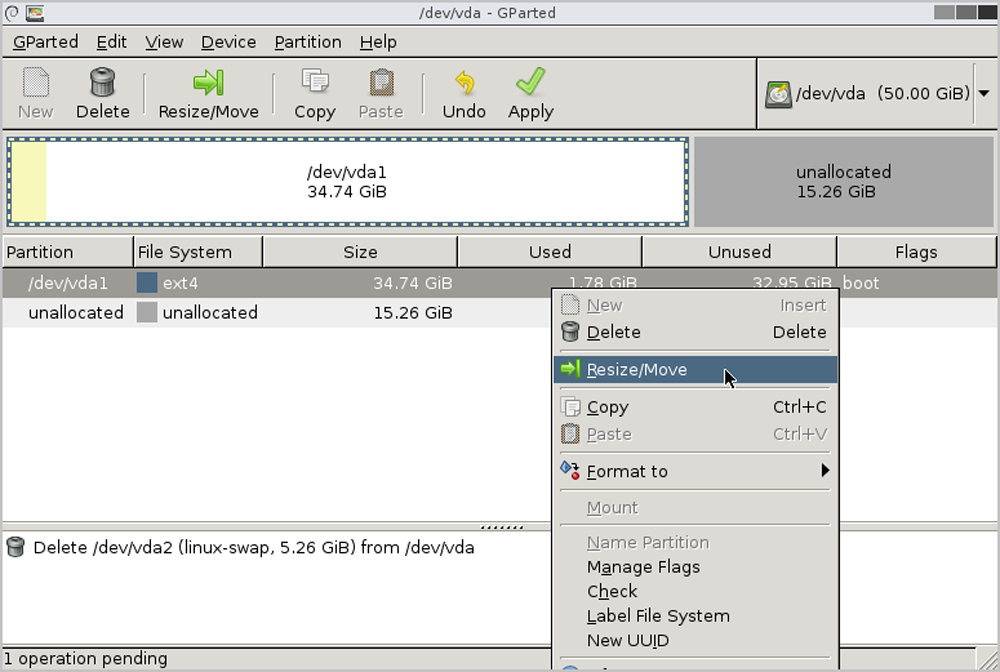
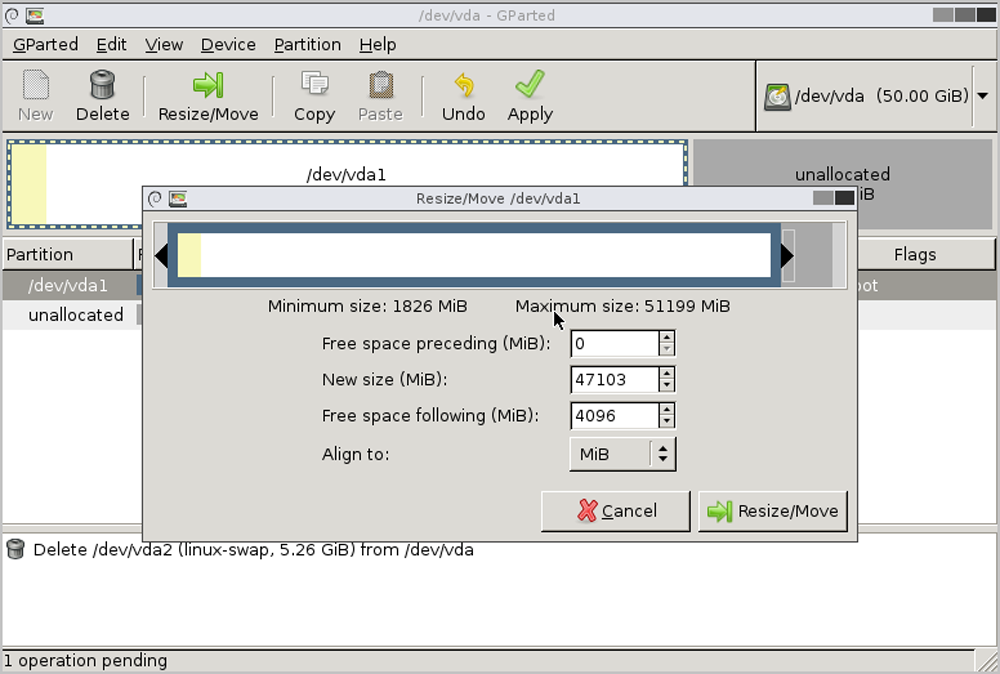
Figure 5. Create a 4 GB swap Partition 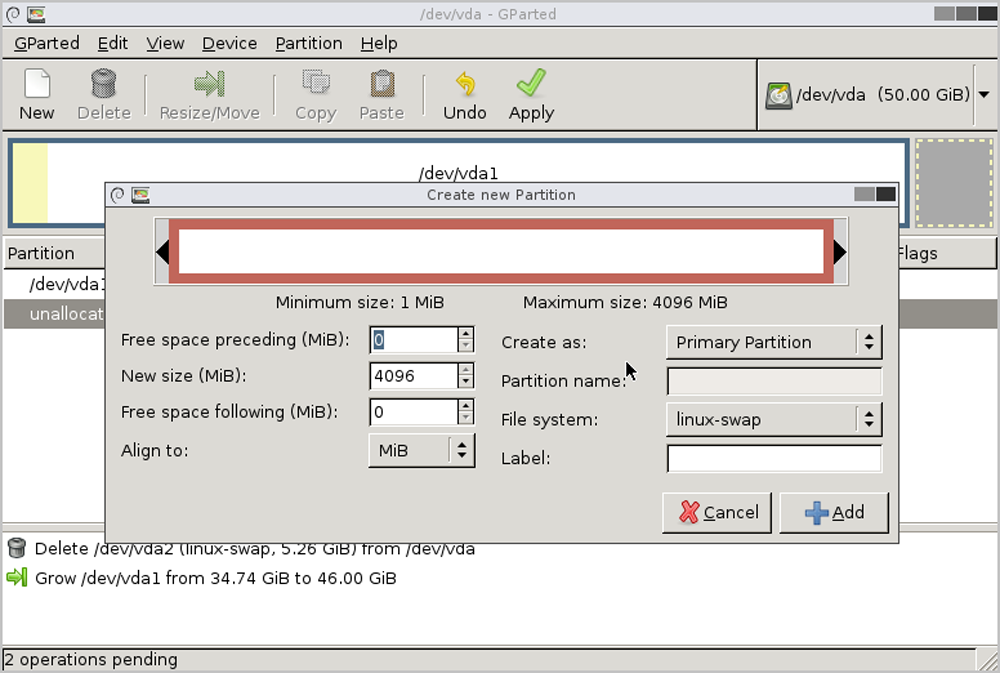
- Power off the VM instance, detach the ISO, and start the VM instance again.
- Launch the VM console and run the
df -hcommand. Then, you can see that the size of the root partition is increased to 46 GB.[root@10-58-21-213 ~]# df -h Filesystem Size Used Avail Use% Mounted on /dev/vda1 46G 1.2G 42G 3% / - Enable the swap partition and modify the
/etc/fstab disk partition
table.
[root@10-58-21-213 ~]# fdisk -l|grep vda Disk /dev/vda: 53.7 GB, 53687091200 bytes, 104857600 sectors /dev/vda1 * 2048 96468991 48233472 83 Linux /dev/vda2 96468992 104857599 4194304 82 Linux swap / Solaris [root@10-58-21-213 ~]# mkswap /dev/vda2 mkswap: /dev/vda2: warning: wiping old swap signature. Setting up swapspace version 1, size = 4194300 KiB no label, UUID=ed99f72b-aafb-43ad-be8f-fcd09794beb0 #You can see that the UUID of the swap partition is ed99f72b-aafb-43ad-be8f-fcd09794beb0. [root@10-58-21-213 ~]# swapon /dev/vda2 #Enable the swap partition. [root@10-58-21-213 ~]# free -m total used free shared buff/cache available Mem: 911 106 671 6 133 657 Swap: 4095 0 4095 [root@10-58-21-213 ~]# sed -i '/swap/d' /etc/fstab echo "UUID=ed99f72b-aafb-43ad-be8f-fcd09794beb0 swap swap defaults 0 0" #Write the swap settings into the disk partition table so that it can be started automatically upon the VM boots. - After you power off and reboot the VM instance, the ext4 partition of the root volume is resized successfully, and the swap partition reserves 4 GB.
- Use the LVM partition tool to resize the LVM partition for
an instance that has both the xfs and swap partitions.Note: This method applies
to the dynamic resizing of LVM partitions without the need of using other
tools.
Assume that the VM instance uses an LVM partition and formats the LVM partition as a boot partition, an xfs root partition, and a swap partition. In this scenario, the size of the xfs root partition and swap partition is 94 GB and 6 GB, respectively. Therefore, the total size is 100 GB. After you resize the root volume from 100 GB to 120 GB, you want to add the increased size to the xfs root partition.
Procedure:- View the current partition and the LVM partition. Here, the size of
the boot partition, LVM partition, and swap partition is 500 MB, 94
GB, and 6 GB, respectively. The boot partition and LVM partition use
/dev/vda1 and
/dev/vda2, respectively. The path of the
LVM partition and swap partition is
/dev/vg/root and
/dev/vg/swap,
respectively.
[root@10-0-44-221 ~]# df -h Filesystem Size Used Avail Use% Mounted on /dev/mapper/vg-root 94G 6.5G 88G 7% / /dev/vda1 477M 104M 344M 24% /boot #The boot partition is 500 MB and uses /dev/vda1. #The LVM partition is 94 GB and uses /dev/vda2. Path: /dev/vg/root. #The swap partition is 6 GB. Path: /dev/vg/swap. [root@10-0-44-221 ~]# fdisk -l |grep vda Disk /dev/vda: 128.8 GB, 128849018880 bytes, 251658240 sectors /dev/vda1 * 2048 1026047 512000 83 Linux /dev/vda2 1026048 209715199 104344576 8e Linux LVM [root@10-0-44-221 ~]# pvdisplay |egrep "Name|Size" PV Name /dev/vda2 VG Name vg PV Size 99.51 GiB / not usable 3.00 MiB PE Size 4.00 MiB #The physical volume uses /dev/vda2. [root@10-0-44-221 ~]# vgdisplay |egrep "Name|Size" VG Name vg VG Size 99.51 GiB PE Size 4.00 MiB alloc PE / Size 25463 / 99.46 GiB Free PE / Size 11 / 44.00 MiB #The volume group information. Name: vg. This volume group will be resized. [root@10-0-44-221 ~]# lvdisplay |egrep "Name|Size" LV Name root VG Name vg LV Size 93.59 GiB LV Name swap VG Name vg LV Size 5.88 GiB #The logical volume information. - After the resizing, run the
fdisk /dev/vdacommand to partition the increased size, create a new partition by usingn, set the new partition to LVM format by usingt, and make the setting take effect by usingw. To make the setting take effect immediately, run thepartprobecommand.[root@10-0-44-221 ~]# fdisk /dev/vda Welcome to fdisk (util-linux 2.23.2). Changes will remain in memory only, until you decide to write them. Be careful before using the write command. Command (m for help): p Disk /dev/vda: 128.8 GB, 128849018880 bytes, 251658240 sectors Units = sectors of 1 * 512 = 512 bytes Sector size (logical/physical): 512 bytes / 512 bytes I/O size (minimum/optimal): 512 bytes / 512 bytes Disk label type: dos Disk identifier: 0x0008168e Device Boot Start End Blocks Id System /dev/vda1 * 2048 1026047 512000 83 Linux /dev/vda2 1026048 209715199 104344576 8e Linux LVM Command (m for help): n Partition type: p primary (2 primary, 0 extended, 2 free) e extended Select (default p): Using default response p Partition number (3,4, default 3): First sector (209715200-251658239, default 209715200): Using default value 209715200 Last sector, +sectors or +size{K,M,G} (209715200-251658239, default 251658239): Using default value 251658239 Partition 3 of type Linux and of size 20 GiB is set Command (m for help): t Partition number (1-3, default 3): Hex code (type L to list all codes): 8e Changed type of partition 'Linux' to 'Linux LVM' Command (m for help): p Disk /dev/vda: 128.8 GB, 128849018880 bytes, 251658240 sectors Units = sectors of 1 * 512 = 512 bytes Sector size (logical/physical): 512 bytes / 512 bytes I/O size (minimum/optimal): 512 bytes / 512 bytes Disk label type: dos Disk identifier: 0x0008168e Device Boot Start End Blocks Id System /dev/vda1 * 2048 1026047 512000 83 Linux /dev/vda2 1026048 209715199 104344576 8e Linux LVM /dev/vda3 209715200 251658239 20971520 83 Linux LVM Command (m for help): w The partition table has been altered! Calling ioctl() to re-read partition table. WARNING: Re-reading the partition table failed with error 16: Device or resource busy. The kernel still uses the old table. The new table will be used at the next reboot or after you run partprobe(8) or kpartx(8) Syncing disks. [root@10-0-44-221 ~]# partprobe - Create a physical volume for the newly formatted
partition.
[root@10-0-44-221 ~]# pvcreate /dev/vda3 Physical volume "/dev/vda3" successfully created #Create a physical volume. - Extend the volume
group.
[root@10-0-44-221 ~]# vgextend vg /dev/vda3 Volume group "vg" successfully extended #Name of the volume group: vg. The new partition will be added to the volume group vg. - Disable the swap partition and delete the original swap logical
volume.
[root@10-0-44-221 ~]# swapoff -a [root@10-0-44-221 ~]# lvremove /dev/vg/swap Do you really want to remove active logical volume swap? [y/n]: yes Logical volume "swap" successfully removed - Add 20 GB to the logical volume
/dev/vg/root.
[root@10-0-44-221 ~]# lvextend -L +20G /dev/vg/root Size of logical volume vg/root changed from 93.59 GiB (23959 extents) to 113.59 GiB (29079 extents). Logical volume root successfully resized. #Add 20 GB to /dev/vg/root. [root@10-0-44-221 ~]# lvdisplay --- Logical volume --- LV Path /dev/vg/root LV Name root VG Name vg LV UUID UkyCVW-gd5E-Z4Q2-bVHv-T84e-c3GH-ZMiUdF LV Write Access read/write LV Creation host, time localhost, 2017-07-26 13:18:40 +0800 LV Status available # open 1 LV Size 113.59 GiB Current LE 29079 Segments 2 allocation inherit Read ahead sectors auto - currently set to 8192 Block device 253:0 - Run the
xfs_growfscommand to resize the XFS file system, make the new size take effect, and check the new partition.[root@10-0-44-221 ~]# xfs_growfs /dev/vg/root meta-data=/dev/mapper/vg-root isize=256 agcount=4, agsize=6133504 blks = sectsz=512 attr=2, projid32bit=1 = crc=0 finobt=0 data = bsize=4096 blocks=24534016, imaxpct=25 = sunit=0 swidth=0 blks naming =version 2 bsize=4096 ascii-ci=0 ftype=0 log =internal bsize=4096 blocks=11979, version=2 = sectsz=512 sunit=0 blks, lazy-count=1 realtime =none extsz=4096 blocks=0, rtextents=0 data blocks changed from 24534016 to 29776896 [root@10-0-44-221 ~]# df -h|grep vg-root Filesystem Size Used Avail Use% Mounted on /dev/mapper/vg-root 114G 6.5G 108G 6% / #Resizing of the new partition takes effect. - Divide a new size from the logical volume group to the swap
partition, enable the swap partition, and write the disk
configuration.
[root@10-0-44-221 ~]# lvcreate -L 4G -n swap vg Logical volume "swap" created. #Create a 4 GB partition named swap from the volume group vg. [root@10-0-44-221 ~]# mkswap /dev/vg/swap Setting up swapspace version 1, size = 4194300 KiB no label, UUID=bfc8a843-c758-4665-adfe-e32752ceda44 #Create a swap partition. Here, you can see that the UUID of the swap partition is bfc8a843-c758-4665-adfe-e32752ceda44. [root@10-0-44-221 ~]# swapon /dev/mapper/vg-swap #Enable the swap partition. [root@10-58-21-213 ~]# sed -i '/swap/d' /etc/fstab echo "UUID=bfc8a843-c758-4665-adfe-e32752ceda44 swap swap defaults 0 0" #Write the swap settings into the disk partition table so that the swap partition can be enabled automatically after the VM instance is started. - After you power off and reboot the VM instance, the XFS system of the VM LVM partition is resized successfully, and the swap partition reserves 4 GB.
- View the current partition and the LVM partition. Here, the size of
the boot partition, LVM partition, and swap partition is 500 MB, 94
GB, and 6 GB, respectively. The boot partition and LVM partition use
/dev/vda1 and
/dev/vda2, respectively. The path of the
LVM partition and swap partition is
/dev/vg/root and
/dev/vg/swap,
respectively.
- Use the growpart tool to extend the xfs root partition instance.Note: This
method applies to the dynamic resizing of xfs partitions without the need of
attaching an ISO or using an LVM partition tool.
Assume that the size of the xfs root partition is 6 GB and the total root volume size is 8 GB. After you resize the root volume from 8 GB to 40 GB, you want to add the increased size to the xfs root partition.
Procedure:- View the current partition. You can see that the root volume is
resized to 40 GB, of which the xfs root partition is 6 GB. The extra
disk space is unallocated and is not added to the disk
partition.
[root@10-0-44-210 ~]# lsblk NAME MAJ:MIN RM SIZE RO TYPE MOUNTPOINT sda 8:0 0 400G 0 disk └─sda1 8:1 0 400G 0 part /mnt/nfs-data vda 253:0 0 40G 0 disk ├─vda1 253:1 0 2G 0 part [SWAP] └─vda2 253:2 0 6G 0 part / - Install the growpart
tool.
[root@10-0-44-210 ~]# yum install -y cloud-utils-growpart - Resize the xfs root partition by using the
growpart <DeviceName>
                                    <PartionNumber>
command. Here, the DeviceName of the xfs root partition is /dev/vda and PartionNumber is2.[root@10-0-44-210 ~]# growpart /dev/vda 2 CHANGED: partition=2 start=4196352 old: size=12580864 end=16777216 new: size=79689695 end=83886047 - View the partitions. Then, you can see that the xfs root partition
is resized from 6 GB to 38
GB.
[root@10-0-44-210 ~]# lsblk NAME MAJ:MIN RM SIZE RO TYPE MOUNTPOINT sda 8:0 0 400G 0 disk └─sda1 8:1 0 400G 0 part /mnt/nfs-data vda 253:0 0 40G 0 disk ├─vda1 253:1 0 2G 0 part [SWAP] └─vda2 253:2 0 38G 0 part / - Extend the XFS file system.
- To extend the XFS file system, make sure that the xfsprogs
tool is installed. The installation command is as
follows:
[root@10-0-44-210 ~]# yum install xfsprogs - Extend the file system in /dev/vda2 by
running the
xfs_growfscommand. Here, / is the mount point.[root@10-0-44-210 ~]# xfs_growfs / meta-data=/dev/vda2 isize=256 agcount=26, agsize=393152 blks = sectsz=512 attr=2, projid32bit=1 = crc=0 finobt=0 spinodes=0 data = bsize=4096 blocks=9961211, imaxpct=25 = sunit=0 swidth=0 blks naming =version 2 bsize=4096 ascii-ci=0 ftype=0 log =internal bsize=4096 blocks=2560, version=2 = sectsz=512 sunit=0 blks, lazy-count=1 realtime =none extsz=4096 blocks=0, rtextents=0 data blocks changed from 1572608 to 9961211 - Check whether the file system reflects the increased volume
size.
[root@10-0-44-210 ~]# df -h /
Filesystem      Size  Used Avail Use% Mounted on
/dev/vda2        38G  3.3G   35G   9% /
- To extend the XFS file system, make sure that the xfsprogs
tool is installed. The installation command is as
follows:
Note: We recommend that you install the expansion and formatting tools
according to the actual operating system. For example,- For CentOS 7, install the following
tool:
yum install cloud-utils-growpart yum install xfsprogs - For Ubuntu 14, Ubuntu 16, Ubuntu 18, and Debian 9, install the
following
tool:
apt install cloud-guest-utils apt install xfsprogs - For Debian 8, openSUSE 42.3, openSUSE 13.1, and SLES 12 SP2, use the growpart or xfsprogs tool of the upstream version.
- View the current partition. You can see that the root volume is
resized to 40 GB, of which the xfs root partition is 6 GB. The extra
disk space is unallocated and is not added to the disk
partition.
- Resize the Windows partitions.You can resize disks of Windows partitions on the disk management page.Note: After you resize the disk of a Windows
partition, scan the disk to take effect.