VPC Network
- You need to create an L2 network before you can create an L3 VPC network.
- When you create a VPC network, you can specify a vRouter. Or you can attach a vRouter to the VPC network after you create the VPC network.
- If your VM instances use a VPC network, you cannot detach the VPC network from the VPC vRouter.
- The newly created IP range must not overlap any IP range in the VPC vRouter.
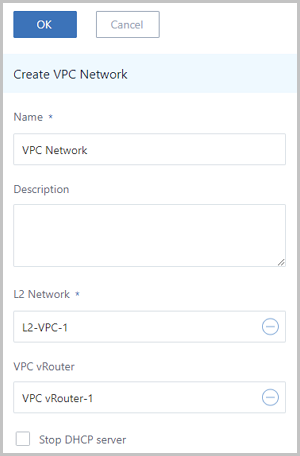
Create VPC Network
- Name: Enter a name for the VPC network.
- Description: Optional. Enter a description for the VPC network.
- L2 Network: Select an L2 network corresponded by the
VPC network.
 Note: ZStack Private Cloud allows you to create multiple L3 networks by using
an L2 network. However, we do not recommend to do so unless you have
special business requirements.Click the Plus sign (⊕) under the L2 Network field. Then, the Select L2 Network page is displayed on the right. This page has the following two tabs:
Note: ZStack Private Cloud allows you to create multiple L3 networks by using
an L2 network. However, we do not recommend to do so unless you have
special business requirements.Click the Plus sign (⊕) under the L2 Network field. Then, the Select L2 Network page is displayed on the right. This page has the following two tabs:- Default: Display a list of L2 networks that do not have an L3 network attached in the current zone.
- All: Display a list of all L2 networks in the current zone, including the L2 networks that have or not have an L3 network attached.
- VPC vRouter: Optional. Specify a VPC vRouter when you create a VPC network. Or attach a VPC vRouter after you create the VPC network.
- Stop DHCP server: Choose whether
to enable the DHCP service.
 Note:
Note:
- By default, this checkbox is not selected, indicating that the DHCP service is enabled, and IP addresses will be automatically allocated to VM instances. In this case, you can customize a DHCP IP address, or let the system randomly specify a DHCP IP address.
- If selected, the DHCP service will be disabled, indicating that VM instances that use this network cannot obtain IP addresses automatically, and need to be configured manually with IP addresses. In this case, you cannot customize the DHCP IP address. In addition, the system cannot randomly specify a DHCP IP address.
- Add IP Range: Select a network
address type, including IPv4 and IPv6. Then, add a network range, including
IP range and CIDR.Next, we will introduce 4 types of network range scenario successively as follows.
- IPv4 | IP Range.If you select the IPv4 network address and add the network range via IP Range, set the following parameters:
- Start IP: Enter a start IP address for the network range, such as 172.20.108.100.
- End IP: Enter an end IP address for the network range, such as 172.20.108.200.
- Netmask: Enter a netmask for the network range, such as 255.255.0.0.
- Gateway: Enter a gateway for the network range, such as 172.20.0.1.
- DHCP IP:
Optional. Enter a DHCP IP address as needed, such as
172.20.108.10.
 Note:
Note:
- If you create an L3 network and enable the DHCP service for the first time, or if you add the first IP range for the L3 network of the enabled DHCP service, you can customize the DHCP IP address.
- If the L3 network has a DHCP IP address, you cannot customize the DHCP IP address when you add an IP range.
- The DHCP IP address can be included or excluded on the added IP range. However, the DHCP IP address must be within the CIDR to which the added IP range belongs, and must not be occupied.
- The IP range specified within the start IP address and end IP address cannot contain IP addresses of the link-local address (169.254.0.0/16).
- If not specified, the system will randomly specify an IP address within the IP range that you added.
An IPv4 address with the IP range can be selected, as shown in IPv4 | IP Range.Figure 1. IPv4 | IP Range 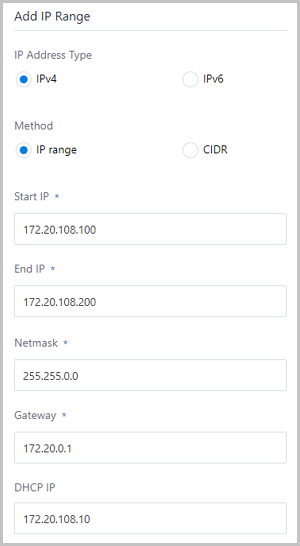
 Note: When you add network ranges with IPv4 | IP
Range, note the following:
Note: When you add network ranges with IPv4 | IP
Range, note the following:- You must not include the gateway (for example, xxx.xxx.xxx.1), broadcast address (for example, xxx.xxx.xxx.255), and network address (for example, xxx.xxx.xxx.0) in the added IP range.
- The network range of a private network cannot overlap with the public network or management network on a vRouter offering.
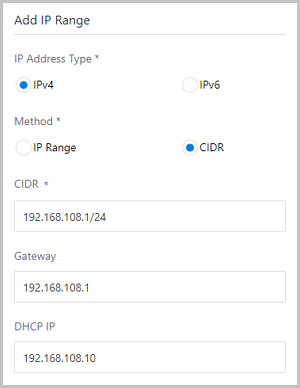
- IPv4 | CIDR.If you select the network address with the IPv4 and add the network range with CIDR, set the following parameters:
- CIDR: Enter a CIDR for the network range, such as 192.168.108.1/24.
- Gateway: Set a gateway, such
as 192.168.108.1.
 Note:
Note:
- The first or the last allowed CIDR IP address can act as a gateway.
- If null, the first IP address that is used by default will serve as a gateway.
- DHCP IP: Optional. Set a DHCP
IP address as needed, such as
192.168.108.10.
 Note:
Note:
- If you create an L3 network and enable the DHCP service for the first time, or if you add the first network range for the L3 network of the enabled DHCP service, you can customize the DHCP IP address.
- If the L3 network has a DHCP IP address, you cannot customize the DHCP IP address when you add the IP range.
- The DHCP IP address can be included or excluded on the IP range that you added. However, the DHCP IP address must not be in conflict with the current CIDR.
- If not specified, the system will randomly specify an IP address within the added IP range.
- The first IP address in a CIDR is deemed as a gateway by default, and cannot serve as a DHCP IP address.
An IPv4 address with the CIDR format can be selected, as shown in Figure 2.Figure 2. IPv4 | CIDR 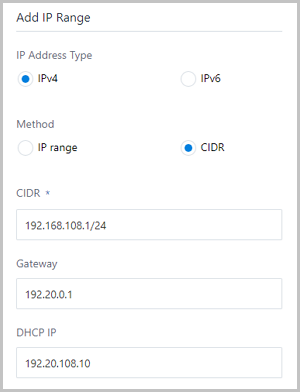
 Note: If you add a network range with IPv4 |
CIDR, set the following parameters:
 - The IP range specified in the CIDR cannot contain IP addresses of the link-local address (169.254.0.0/16).
- The network range of a private network cannot overlap with the public network or management network on a vRouter offering.
- IPv6 | IP Range.If you select the network address with the IPv6 and add the network range with the IP range, set the following parameters:
- Mode: Provide an IP
allocation method. Default method:
Stateful-DHCP.
 Note:
Note:
- Stateful-DHCP: Set a stateful IP
address by using the DHCP protocol.
You can configure both access addresses and other parameters by using the DHCP protocol.
- Stateful-DHCP: Set a stateful IP
address by using the DHCP protocol.
- Start IP: Enter a start IP address for the network range, such as 2000:910A:2222:5498:8475:1111:3900:2002.
- End IP: Enter an end IP address for the network range, such as 2000:910A:2222:5498:8475:1111:3900:2009.
- Prefix Length: Enter a prefix
length for the network range, such as 64.
 Note: The
prefix length is 64-126. If less than 64, you will
fail to create VM instances.
 - Gateway: Enter the gateway for the network range, such as 2000:910A:2222:5498:8475:1111:3900:2001.
- DHCP IP: Optional. Set a DHCP
IP address as needed, such as
2000:910A:2222:5498:8475:1111:3900:2006.
 Note:
Note:
- If you create an L3 network and enable the DHCP service for the first time, or if you add the first IP range for the L3 network of the enabled DHCP service, you can customize the DHCP IP address.
- If the L3 network has a DHCP IP address, you cannot customize the DHCP IP address when you add an IP range.
- The DHCP IP address can be included or excluded on the added IP range. However, the DHCP IP address must be within the CIDR to which the added IP range belongs, and must not be occupied.
- The IP range specified within the start IP address and end IP address cannot contain IP addresses of the link-local address (169.254.0.0/16).
- If not specified, the system will randomly specify an IP address within the IP range that you added.
An IPv6 address with the IP range can be selected, as shown in IPv6 | IP Range.Figure 3. IPv6 | IP Range 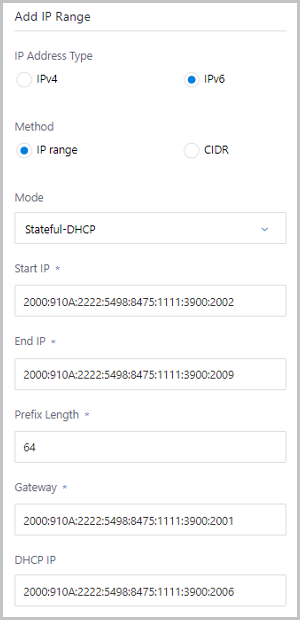
 Note: If you add a network range with IPv6 | IP
Range, set the following parameters:
 - You must not include the gateway (for example, xxxx::1) in the added IP range.
- The IP range specified within the start IP address and end IP address cannot contain IP addresses of the link-local address (fe80::/10).
- The network range of a private network cannot overlap with the public network or management network on a vRouter offering.
- Mode: Provide an IP
allocation method. Default method:
Stateful-DHCP.
- IPv6 | CIDR: If you select the network address with the IPv6 and add the network range with a CIDR, set the following parameters:
- Mode: Provide three types of
IP allocation method: Stateful-DHCP,
Stateless-DHCP, and SLAAC.
 Note:
Note:
- Stateful-DHCP: Set a stateful IP
address by using the DHCP protocol. Default
method: Stateful-DHCP.
You can configure both access addresses and other parameters by using the DHCP protocol.
- Stateless-DHCP: Set a stateless IP
address without using the DHCP protocol.
Access addresses can be automatically derived from the prefix length advertised by routes, while other parameters can be configured by using the DHCP protocol.
- SLAAC: Automatically set the stateless
IP address.
Access addresses can be automatically derived from the prefix length advertised by routes, while other parameters are accompanied in the route advertisement.
- Stateful-DHCP: Set a stateful IP
address by using the DHCP protocol. Default
method: Stateful-DHCP.
- CIDR: Enter CIDR for the network range, such as 234E:2457:3D::/64.
- DHCP IP: Optional. Set the
DHCP IP address as needed, such as
234E:2457:3D::F.
 Note:
Note:
- If you create an L3 network and enable the DHCP service for the first time, or if you add the first network range for the L3 network of the enabled DHCP service, you can customize the DHCP IP address.
- If the L3 network has a DHCP IP address, you cannot customize the DHCP IP address when you add the IP range.
- The DHCP IP address can be included or excluded on the IP range that you added. However, the DHCP IP address must not be in conflict with the current CIDR.
- If not specified, the system will randomly specify an IP address within the added IP range.
- The first IP address in a CIDR is deemed as a gateway by default, and cannot serve as a DHCP IP address.
An IPv6 address with the CIDR format can be selected, as shown in Figure 4.Figure 4. IPv6 | CIDR 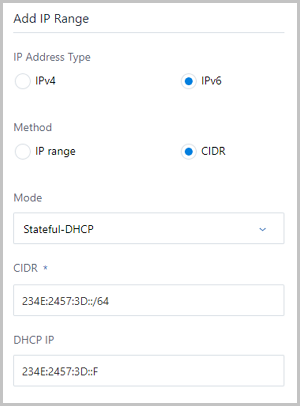
 Note: If you add a network range with IPv6 |
CIDR, set the following parameters:
 - The first IP address in a CIDR has been deemed as a gateway by default.
- The IP range specified in the CIDR cannot contain IP addresses of the link-local address (fe80::/10).
- The network range of a private network cannot overlap with the public network or management network on a vRouter offering.
- Mode: Provide three types of
IP allocation method: Stateful-DHCP,
Stateless-DHCP, and SLAAC.
- IPv4 | IP Range.
VPC Network Operations
- Create VPC network: Create a new private network.
- Attach VPC vRouter: Attach a VPC vRouter to the VPC network.
- Detach VPC vRouter: Detach a VPC vRouter from the VPC network.
- Share to all: Share the VPC network to all the projects or regular accounts. Make sure that you have installed the License of the Enterprise Management module.
- Recall from all: Recall the VPC network from all the projects or regular accounts so that the VPC network is invisible. Make sure that you have installed the License of the Enterprise Management module.
- Delete: Delete the VPC network.
 Note: If you delete a VPC network, VM
instances that use this VPC network will be detached as
well.