The VPC vRouter page displays VPC vRouters and high availability
groups on the ZStack Private Cloud.
VPC vRouter: A virtual router that can be directly created from a vRouter
offering. By default, a VPC vRouter has two types of network: public network and
management network.
Note:
VPC vRouters are the core of VPC. A VPC vRouter can be created by
specifying a vRouter offering.
To create a vRouter offering, create the required public network,
management network, and vRouter image in advance.
A VPC vRouter can be attached to or detached from VPC networks or
other public networks.
The public network and the management network that are defined by a
vRouter offering cannot be detached.
The same vRouter offering can be used to create multiple VPC
vRouters. These VPC vRouters share both the public IP range and the
management IP range defined by the same vRouter offering.
The public network is the default network used to provide network
services.
VPC vRouters have higher resource priorities than VM instances. When
the host workload rates are extremely high, and then resources
contend with each other, the resource priority sequence from low to
high is as follows: VM instances with Normal priorities <
VM instances with High priorities < VPC vRouters. For
example, when CPU resources contend with each other on hosts, VPC
vRouters have higher CPU resource grabbing capability.
VPC vRouter HA group: Deploy a pair of VPC vRouters with
the active-standby mode. When the active VPC vRouter is abnormal, the standby
VPC vRouter will be used to ensure your business continuity.
Note: VPC vRouters
within high availability groups will only be displayed on the details page
of the high availability groups rather than be displayed separately on
vRouter lists.
Next, we will introduce how to create VPC vRouters and high availability groups and check
their details.
Create VPC vRouter
In the navigation pane of the ZStack Private Cloud UI, choose Network Resource > VPC > VPC vRouter. On the VPC vRouter page, click
Create VPC vRouter. On the displayed Create VPC
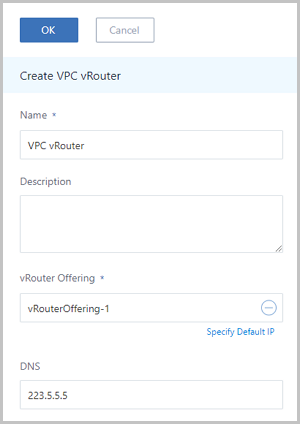
vRouter page, set the following parameters:
Name: Enter a name for the VPC vRouter.
Description: Optional. Enter a description for the
VPC vRouter.
vRouter Offering: Select the vRouter offering that
you created. Make sure that a vRouter offering is available. For more
information about the vRouter offering, see vRouter Offering.
Specify Default IP: Optional. Specify the default IP
address for the VPC vRouter. If null, the Cloud will randomly allocate an IP
address for the VPC vRouter.
DNS: Optional. Configure DNS for the VPC vRouter. If
null, the default DNS address (223.5.5.5) will be used.
Note:
You can set an IPv4 DNS or IPv6 DNS as needed. For example, you
can set the IPv4 DNS to 223.5.5.5 or IPv6 DNS to
240C::6644.
Services in the VPC vRouter can access the public network
services via DNS. If you need to use other DNS for making
resolutions, specify a DNS address as needed.
For VM instances created by using a VPC network, the DNS you
specified here is the gateway of the VPC network. The VM
traffics are forwarded by a VPC vRouter.
You can create a VPC vRouter, as shown in Create VPC
vRouter.Figure 1. Create VPC vRouter
VPC vRouter Operations
You can perform the following operations on a VPC vRouter:
Start: Start the VPC vRouter that is in the stopped state.
Stop: Stop the VPC vRouter that is the running state.
Reboot: Reboot the VPC vRouter.
Reconnect: Reconnect the VPC vRouter.
Note:
Currently, when a ZStack management node reboots after upgrading
successfully, you need to reconnect and upgrade VPC vRouters
manually.
After you reconnect manually and upgrade the VPC vRouters
successfully, you need to configure QoS and IPsec tunnel
services for associated VIPs to ensure that the VIPs work
normally.
Migrate: Allow you to migrate VPC vRouters online.
Assume that you want to migrate VPC vRouters on local storages
online. In the navigation pane of the ZStack Private Cloud UI, choose Settings > Global Settings > Basic Settings, locate Live Migration, and set
the value to true.
Open console: Access the VPC vRouter through the terminal.
Set or cancel console password: Set or cancel the console password for the
VPC vRouter. Note that you need to reboot the VPC vRouter before the setting
takes effect.
Set cross-cluster HA policy: By default, this policy is turned on,
indicating that VPC vRouters can be automatically migrated across clusters.
When turned off, VPC vRouters will be stuck to the specified cluster where
the policy takes effect.
Background information:
For versions earlier than 3.8.0, when a cross-cluster HA
policy of a VPC vRouter triggers, or when the compute node
where a VPC vRouter locates enters maintenance mode, the
Cloud will select other appropriate compute nodes to
automatically recover or migrate the VPC vRouter. In
addition, these appropriate compute nodes might be running
in the current cluster or even across clusters if multiple
clusters attach the same L3 network and primary
storages.
For 3.8.0 and later versions, VPC vRouters allow you to set
a cross-cluster HA policy. When turned off, VPC vRouters
will be stuck to the specified cluster where the policy
takes effect.
Currently, this policy applies to scenarios such as VPC vRouter HA
and host entering maintenance mode.
This policy only affects the VPC vRouter auto-migration behavior.
Other behaviors, such as manual live migration and specifying a host
to start VPC vRouters, are not affected.
When turned on, VPC vRouters will not be stuck to a specified
cluster.
Delete: Delete the VPC vRouter. Exercise caution. If you delete the VPC
vRouter, the associated VM network services will be unavailable. To solve
this issue, create a new VPC vRouter first, and then attach a VPC network
that is used by a VM instance. Finally, reboot the VM instance before the
network services are recovered.
Create or delete DNS, EIP, IPsec tunnel, port forwarding, load balancing, or
VIP: Create or delete the DNS, EIP, IPsec tunnel, port forwarding, load
balancer, or custom VIP.
Change router ID:
A router ID is a dot-decimal notation address (similar to an IPv4 IP
address) assigned to each router within an OSPF area.
The Cloud uses the management network interface of a router to serve
as a router ID by default.
You can manually specify a router ID. We recommend that you use a
steady interface IP address on a router.
Add OSPF area: Add the VPC vRouter to an OSPF area. Note that you cannot add
the same VPC vRouter to different OSPF areas.
Leave OSPF area: Exit the VPC vRouter from an OSPF area. Exercise caution.
After a VPC vRouter exits from an OSPF area, the corresponding OSPF
configurations and routing information will be deleted. VM instances on the
router will not interconnect with the external network through OSPF.
Attach network: Attach a network (VPC network or public network) on the VPC
vRouter to an OSPF area. Note that networks on the same VPC vRouter can be
added to the same OSPF area only.
Detach network: Detach an attached network from an OSPF area. After you
detach the network, the VPC vRouter will delete the routing information
learned by the network interface. In addition, the external routers cannot
learn the routing information that reaches the network. Exercise caution. VM
instances on the network cannot interconnect to external networks through
OSPF.
Create VPC vRouter HA Group
In the navigation pane of the ZStack Private Cloud UI, choose Network Resource > VPC > VPC vRouter. On the VPC vRouter page, click VPC
vRouter HA Group. On the VPC vRouter HA Group
page, click Create VPC vRouter HA Group. On the displayed
Create VPC vRouter HA Group page, set the following
parameters:
Name: Enter a name for the VPC vRouter HA group.
Description: Optional. Enter a description for the
VPC vRouter HA group.
Monitor IP: Set an IP address as the monitor IP
address used for determining the active-standby relationship between two VPC
vRouters within the VPC vRouter HA group.
Note:
A monitor IP address must be a public IP address that can
interconnect to both VPC vRouters within a VPC vRouter HA
group.
A monitor IP address must be a steady, secure IP address.
You can create a VPC vRouter HA group, as shown in Create VPC
vRouter HA Group.Figure 2. Create VPC vRouter HA Group
Add VPC vRouter: Add VPC vRouters to the VPC vRouter
HA group. If selected, VPC vRouters will be directly added to the VPC
vRouter HA group. The Cloud will create and configure synchronously the
identical peer VPC vRouters. To add a VPC vRouter for the VPC vRouter HA
group, set the following parameters:
Add Method: Select a method to add the VPC
vRouter. Options: Create | Import.
If you select Create, a new VPC
vRouter will be created and added to the VPC vRouter HA
group. Meanwhile, the Cloud will create and configure
synchronously the identical peer VPC vRouter.
VPC vRouter Name: Enter a name for
the VPC vRouter.
Description: Optional. Enter a
description for the VPC vRouter.
vRouter Offering: Select the vRouter
offering that you create.
Note:
Make sure that you create vRouter offerings in
advance. For more information about the vRouter
offerings, see vRouter Offering.
After you create a VPC vRouter successfully, set
DNS on the VPC vRouter HA group details page to
ensure the active-standby relationship of the VPC
vRouter to ensure that the VPC vRouter works
normally.
Specify VIP: Optional. Specify a
public IP address as the VIP of the VPC vRouter HA group. If
null, the Cloud will automatically allocate a public IP
address for you.
If you select Import, an existing VPC
vRouter will be added to the VPC vRouter HA group. After you
import the existing VPC vRouter successfully, this VPC
vRouter cannot be used independently. The Cloud will create
and configure synchronously the identical peer VPC
vRouters.
VPC vRouter: Select an existing VPC vRouter.
Note:
The imported VPC vRouters must be in the stopped
state.
Exercise caution. If you perform the
Import operation, all the
configurations of the existing VPC vRouter will be
imported synchronously. After you import the
existing VPC vRouter successfully, the VPC vRouter
cannot be used independently.
If the existing VPC vRouter uses the same
network to serve as the public network and the
system network, you cannot add this VPC vRouter to
the VPC vRouter HA group.
If the chosen VPC vRouter does not attach a vRouter
offering, select manually the vRouter offering.
You can perform the following operations on a VPC vRouter HA group:
Add VPC vRouter: Add a VPC vRouter to a VPC vRouter HA group.
Note: After you
create a VPC vRouter successfully, set DNS on the VPC vRouter HA group
details page to ensure the active-standby relationship of the VPC
vRouter to ensure that the VPC vRouter works normally.
Delete: Delete the VPC vRouter HA group. Exercise caution. All VPC vRouters
within the VPC vRouter HA group will be deleted as well.
Notice
When you use a VPC vRouter, make sure that:
VPC networks in different VPC vRouters are isolated from one another on L2
networks by default.
IP ranges of different VPC networks under the same VPC vRouter must not
overlap from one another. Gateways of any two VPC networks cannot be the
same.
Before a regular account creates VPC vRouters, the admin needs to share
vRouter offerings. Or otherwise, the regular account cannot create VPC
vRouters and VPC networks.
VPC vRouters that are both in the running state and in the connected state
can normally provide a group of network services. If the VPC vRouters are in
other states, check whether associated resources can work properly.
 Note:
Note: