IPsec Tunnel
An IPsec tunnel encrypts and authenticates IP addresses by groups to protect the network transfer data of IP protocols. It provides site-to-site VPN connections.
- IPsec connection mode
For security reasons, we only support Main Mode and the Encapsulating Security Payload (ESP) protocol, while Aggressive Mode is not supported.
- IPsec transfer mode
Considering the cloud network model, we only support the site-to-site tunnel mode. The point-to-point PC mode is not supported.
- IPsec routing model
We only support the IPsec routing model that is based on the source-to-destination IP range matching model. The routing forwarding mode is not supported. Notice that OSPF and BGP dynamic routing protocols are not supported.
This topic mainly introduces the IPsec tunnel usage in vRouter networks. For information about the detailed usage of an IPsec tunnel in VPC, see IPsec Tunnel in VPC Tutorial.
- vRouter networks can be used in two isolated ZStack Private Cloud environments. In these two environments, the private networks of VM instances cannot be intercommunicated directly. An IPsec tunnel can be used to realize intercommunication between private networks of the VM instances, as shown in IPsec Tunnel Usage Scenarios in vRouter Networks.
-
Figure 1. IPsec Tunnel Usage Scenarios in vRouter Networks 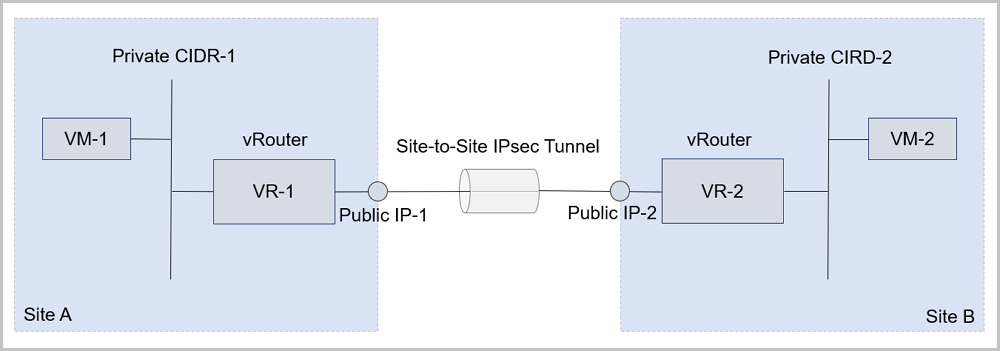
How to Use IPsec Tunnel in vRouter Network
- In the first environment, create an IPsec tunnel, specify the local public IP address of the first environment, and specify a local private network that is available. Enter the public IP address of the second environment as the peer IP address, and enter the private network specified in the second environment as the peer network.
- In the second environment, create an IPsec tunnel, specify the local public IP address of the second environment, and specify a local private network that is available. Enter the public IP address of the first environment as the peer IP address, and enter the private network specified in the first environment as the peer network.
 Note: The private IP ranges in these two vRouter network
environments cannot overlap.
Note: The private IP ranges in these two vRouter network
environments cannot overlap.Create IPsec Tunnel in the First Environment
- Name: Enter a name for the IPsec tunnel, for example, IPsecTunnel-1.
- Description: Optional. Enter a description for the IPsec tunnel.
- Select VIP: Select a VIP for the IPsec tunnel. The
IPsec tunnel service is provided by a VIP.To use a VIP, select one of the following methods:
- Create new IP:To create a new VIP, set the following parameters:
- Network: Select a network that provides a VIP. The network can be a public network or a flat network.
- IP Range: Optional. Specify an IP range. Note that an IPv4 public network allows you to select a normal IP range or an IP address pool.
- Specified IP: Optional. Specify a VIP. If not specified, the system will automatically assign a VIP.
As shown in Figure 2.Figure 2. Create new VIP 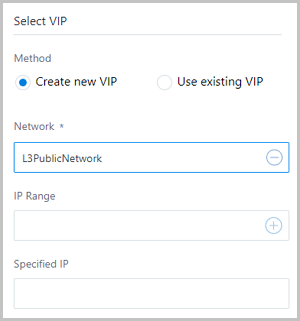
- Use existing IP:To use an existing VIP, set the following parameter:
- VIP: Select an existing VIP.
As shown in Figure 3.Figure 3. Use existing VIP 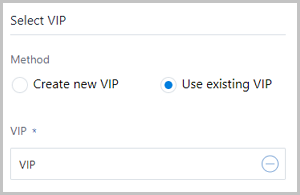
Note: The system VIP provided by vRouters can be used to provide IPsec
tunnel services. - Create new IP:
- Local Subnet: Select a private network attached by the local vRouter. If only one private network is attached by the local vRouter, this private network will be selected by default.
- Peer Public IP: Enter the public IP address of the peer network.
- Peer CIDR: Enter the private CIDR specified on the peer network.
- Authentication Key: Enter an authentication key. We recommend that you use a strong authentication key.
- Advanced: Configure the advanced options as needed. The default
values of the following options can be used to connect the private networks
in these two network environments.
- Authentication Mode: psk
- IPsec Mode: tunnel
- IKE Authentication Algorithm: sha1
- IKE Encryption Algorithm: 3des
- IKE DH Group: 2
- IPsec Security Protocol: esp
- ESP Authentication Algorithm: sha1
- ESP Encryption Algorithm: 3des
- Perfect Forward Secrecy: dh-group2
Note:
- In your practice, to connect your vRouter in ZStack Private Cloud to third-party devices that support IPsec tunnels, configure the advanced options on both sides as needed.
- When you create an IPsec tunnel, you need to modify the advanced options according to the peer network.

Create IPsec Tunnel in the Second Environment

After these two IPsec tunnels are created, the private networks in these two ZStack environments can communicate with each other.
IPsec Tunnel Operations
- Change name and description: Change the name and description of the IPsec tunnel.
- Delete: Delete the IPsec tunnel. Note that the services provided by the IPsec tunnel will also be deleted. However, the corresponding VIP and services associated with the VIP are not affected.
- Audit: View the related operations supported by the IPsec tunnel.
- Change name and description: Change the name and description of the IPsec tunnel.
- Attach local subnet: Attach more than one local private network to the IPsec tunnel in the VPC network scenario.
- Detach local subnet: Detach a local private network from the IPsec tunnel.
- Add peer CIDR: You can add more than one peer CIDR to the IPsec tunnel in the VPC network scenario.
- Delete peer CIDR: Delete a peer CIDR from the IPsec tunnel.
- Delete: Delete the IPsec tunnel. Note that the services provided by the IPsec tunnel will also be deleted. However, the corresponding VIP and services associated with the VIP are not affected.
- Audit: View the related operations supported by the IPsec tunnel.