Port Forwarding
- In private networks that enable the source network address translation (SNAT) service, VM instances can access the external network, but cannot be accessed by the external network. A port forwarding rule can be used to allow the external network to access some specified ports of VM instances behind SNAT.
- An elastic port forwarding rule can be dynamically attached to or detached from VM instances.
- The port forwarding service can only be provided by vRouters or VPC vRouters.
- A port forwarding rule can be created between public networks of a
vRouter or VPC vRouter and private networks of VM instances, as shown in
Port
Forwarding.
Figure 1. Port Forwarding 
- A port forwarding rule can be created between public networks of a
vRouter or VPC vRouter and private networks of VM instances, as shown in
Port
Forwarding.
- The port forwarding service is provided by VIP.
- A VIP corresponds to an available IP address in a public IP resource pool.
- To create port forwarding by using a VIP, either create a new VIP or use an existing VIP.
- To specify port mappings for port forwarding, choose one-to-one port mapping or range-to-range port mapping, as shown in VIP - Port Forwarding.
-
Figure 2. VIP - Port Forwarding 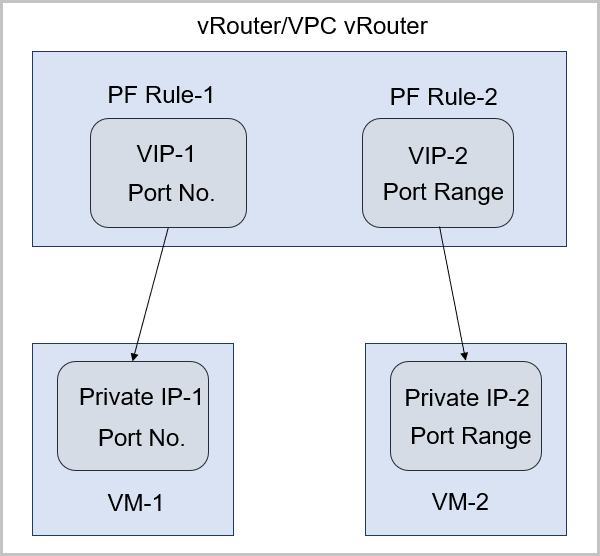
Create Port Forwarding Rule
- Name: Enter a name for the port forwarding rule.
- Description: Optional. Enter a description for the port forwarding rule.
- Select VIP: Select a VIP for the port forwarding
rule. The port forwarding service is provided by a VIP.To use a VIP, select one of the following methods:
- Create new IP:To create a new VIP, set the following parameters:
- Network: Select a network that provides a VIP. The network can be a public network or a flat network.
- IP Range: Optional. Specify an IP range. Note that an IPv4 public network allows you to select a normal IP range or an IP address pool.
- Specified IP: Optional. Specify a VIP. If not specified, the system will automatically assign a VIP.
As shown in Figure 3.Figure 3. Create new VIP 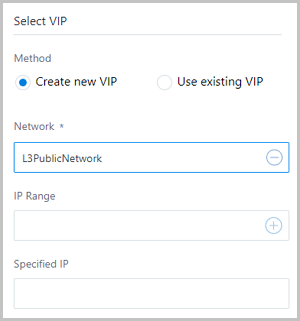
- Use existing IP:To use an existing VIP, set the following parameter:
- VIP: Select an existing VIP.
As shown in Figure 4.Figure 4. Use existing VIP 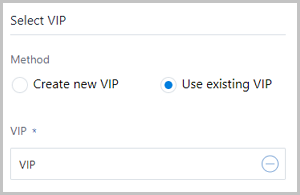
 Note: The system VIPs provided by vRouters or VPC vRouters can
be used by the port forwarding service.
Note: The system VIPs provided by vRouters or VPC vRouters can
be used by the port forwarding service. - Create new IP:
- Protocol: Select a protocol.
Options: TCP and UDP.
- TCP: Supports ports 1-65535.
- UDP: Supports ports 1-65535.
- Port: Select Specified port (forward traffics
from port to port), or Port range (forward traffics in a port
range).
- Specified port:If you select Specified port, set the following parameters:
- Source Start Port: Enter a port between port 1 and port 65535 as the source start port.
- Source End Port: Automatically set by the system, and is the same as the source start port that you specified.
- VM Start Port: Select a port between port 1 and port 65535 as the start port of the VM instance.
- VM End Port: Automatically set by the system, and is the same as the start port of the VM instance you specified.
- Allowed CIDR: Optional. If specified, only the specified CIDR is allowed.
For example, if you set the source start port to 24, and the start port of the VM instance to 22, traffics to port 24 of the public IP addresses will be forwarded to port 22 of the VM instance.
As shown in Figure 5.Figure 5. Create Port Forwarding Rule - Specified port 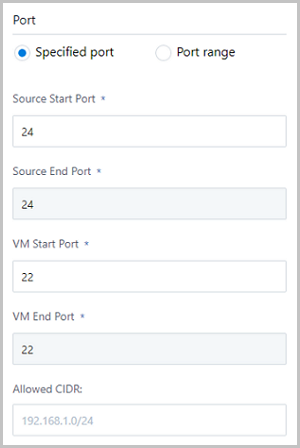
- Port range:If you select Port range, set the following parameters:
- Source Start Port: Enter a port between port 1 and port 65535 as the source start port.
- Source End Port: Enter a port between port 1 and port 65535 as the source end port.
- VM Start Port: Automatically set by the system, and is the same as the source start port you specified.
- VM End Port: Automatically set by the system, and is the same as the source end port you specified.
- Allowed CIDR: Optional. If specified, only the specified CIDR is allowed.
For example, if you set the port range to 22-80, the port range of the VM instance will be 22-80 by default. Then, traffics to ports 22-80 of the public IP addresses will be forwarded to ports 22-80 of the VM instance.
As shown in Figure 6.Figure 6. Create Port Forwarding Rule - Port range 
- Specified port:

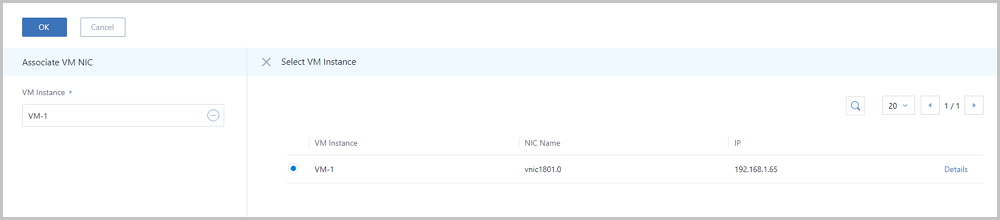
Associate Port Forwarding Rule to VM NIC
On the displayed Associate VM NIC page, click the Plus sign (+) in the VM Instance section. On the displayed Select VM Instance page, select the target VM instance, and click OK.

Port Forwarding Operations
- Modify name and description: Modify the name and description of the port forwarding rule.
- Associate: Associate the port forwarding rule with a VM NIC.
- Disassociate: Disassociate the port forwarding rule from a VM NIC.
- Delete: Delete the port forwarding rule. Note that the port forwarding service provided by the port forwarding rule will also be deleted. However, the associated VIP and other services will not be affected.
- Audit: View the related operations supported by the port forwarding.
Constraints
- To use port forwarding, make sure that the firewall policy in the VM instances can be accessed by the specified ports.
- When you use a VIP to provide the port forwarding service, make sure that the ports used by the VIP are not duplicated.
- A VIP can provide the port forwarding service to different ports of multiple VM NICs on the same L3 network.
- A VM instance can only use one VIP to provide the port forwarding service.
- When you disassociate a VIP from a VM instance and associate a VM instance again, you can only select the VM NIC on the same L3 network of the VM instance that you disassociated before.
- If you select port range for port forwarding, make sure that the source port range and the VM port range are the same. For example, if you set the range of the source port to 22-80, the port range of the VM instance is also 22-80.