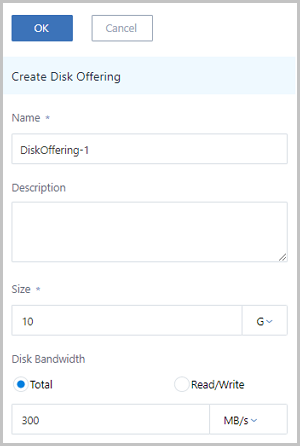
Create Disk Offering
In the navigation pane of the ZStack Private Cloud UI, choose . On the Disk Offering page, click Create Disk
Offering. On the displayed Create Disk Offering page, set
the following parameters:
- Name: Enter a name for the disk offering.
- Description: Optional. Enter a description for the disk offering.
- Size: Set the volume size.
- Disk Bandwidth: Optional. Set the upper limit of the volume I/O
bandwidth. If not specified, the I/O bandwidth is not limited. Unit: MB/s | GB/s | TB/s.
The disk bandwidth parameter has the following two options:
- Total:
If you select Total, set the upper limit of the total read and write speed of the volume.
As shown in Figure 1.Figure 1. Total Bandwidth 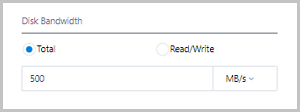
- Read/Write:As shown in Figure 2.
Figure 2. Read/Write Bandwidth 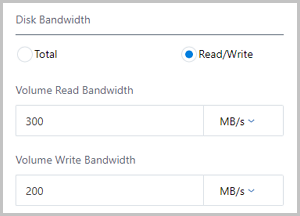
If you select Read/Write, set the following parameters:- Volume Read Bandwidth: Set the upper limit of the read speed of the volume.
- Volume Write Bandwidth: Set the upper limit of the write speed of the volume.
- Total:
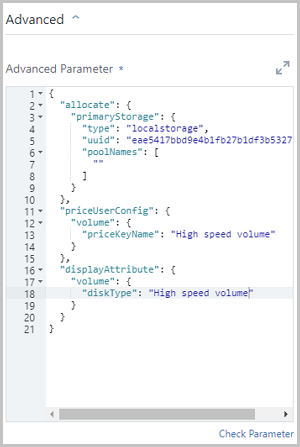
- Advanced: You can configure advanced parameters in JSON format to
customize the disk performance.Sample:
The sample above contains three configurations:{ "allocate": { "primaryStorage": { "type": "Enter the primary storage type. Options: Ceph | LocalStorage | NFS | SharedBlock.", "uuid": "Enter the primary storage UUID.", "poolNames": [ "Enter the name of the Ceph pool. If the primary storage type is not Ceph, delete the poolNames configuration." ] } }, "priceUserConfig": { "volume": { "priceKeyName": "Customize the billing name of the data volume. The advanced parameters of the pricing list must be consistent with this field. Otherwise, the related billing metrics cannot be generated." } }, "displayAttribute": { "volume": { "diskType": "Customize the display type of the data volume. This field is displayed on the details page of the volume." } } }- Configure the primary storage of the data
volume.
"allocate": { "primaryStorage": { "type": "Enter the primary storage type. Options: Ceph | LocalStorage | NFS | SharedBlock.", "uuid": "Enter the primary storage UUID.", "poolNames": [ "Enter the name of the Ceph pool. If the primary storage type is not Ceph, delete the poolNames configuration." ] } }- type: Enter the primary storage type. Options: Ceph | LocalStorage | NFS | SharedBlock. If the type is Ceph, you can specify a Ceph pool.
- uuid: Enter the primary storage UUID.
- poolNames: Enter the name of the Ceph pool. If the primary storage type is not Ceph, delete the poolNames configuration.
 Note: If no primary storage is specified, delete all the preceding
codes.
Note: If no primary storage is specified, delete all the preceding
codes. - Configure the billing type of the data
volume.
"priceUserConfig": { "volume": { "priceKeyName": "Customize the billing name of the data volume. The advanced parameters of the pricing list must be consistent with this field. Otherwise, the related billing metrics cannot be generated." } }- priceKeyName: Customize the billing type of the data volume. The advanced parameters of the pricing list must be consistent with this field. Otherwise, the related billing metrics cannot be generated.
Note: If no billing is required, delete all the preceding codes. - Configure the display attributes of the data
volume.
"displayAttribute": { "volume": { "diskType": "Customize the display type of the data volume. This field is displayed on the details page of the volume." } }- volume: Customize the display name of the data volume. This field is displayed on the details page of the volume. You can configure multiple attributes in the key-value format.
Note: If no special display is required, delete all the preceding
codes.
- Configure the primary storage of the data
volume.