On the Image management page, click
Add Image. Then, the Add Image
page is displayed, as shown in Add System
Image.Figure 1. Add System Image To add an image, set the following parameters:
Name: Enter a name for the image.
Description: Optional. Enter a description for
the image.
Image Type: Select system image. The system image
supports three types of image format, including qcow2, ISO, and
raw.
Platform: Select an image platform. An image
platform decides whether to use a KVM Virtio driver (including disk
driver and NIC driver) when you create VM instances.
The supported
platforms are as follows:
Linux: Uses a Virtio driver.
Windows: Not to use a Virtio driver. Instead, QEMU is used. The image operating
system is a Windows OS without a Virtio driver installed.
WindowsVirtio: Uses a Virtio driver. The image operating system is a Windows OS
with a Virtio driver (including disk driver and NIC driver) installed.
Other: Not to use a Virtio driver. Instead, QEMU is used. The image operating
system can be of any types.
Paravirtualization: Uses a Virtio driver. The image operating system can be any
operating system with a Virtio driver installed.
Backup Storage: Select a backup storage that you
created before.
Image URL: Enter a local URL or upload a local
file.
URL: Enter the path that can be used to download the image.
Before you enter a URL, make sure that the URL can be
accessed by a backup storage and the corresponding
backup storage file exists.
Before you upload an image by using the SFTP
password-free method, make sure that password-free SSH
access can be achieved between a backup storage and the
SFTP server.
Smooth, continuous display of progress bar, and
breakpoint resume:
The ImageStore backup storage supports smooth,
continuous display of progress bar, and breakpoint
resume.
The Ceph backup storage supports smooth,
continuous display of progress bar, but does not
support breakpoint resume.
The SFTP backup storage does not support smooth,
continuous display of progress bar, or breakpoint
resume.
If you upload an image by using
file:///, make sure that:
The Ceph backup storage currently does not
support the file:/// format.
The file:/// path contains
three forward slashes (/), which correspond
to the absolute path of the backup storage.
For example,
file:///opt/zstack-dvd/zstack-image-1.4.qcow2.
The zstack-image-1.4.qcow2 file needs to be
stored in the /opt/zstack-dvd
directory of the backup storage.
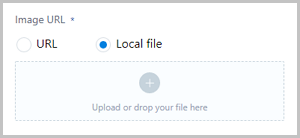
Local file: Upload directly an image that can be reached by the
current browser. Two types of backup storage are supported,
including ImageStore and Ceph.
As shown in Figure 2.Figure 2. Image Uploading via Local Browser
Note:
When you add an image by uploading a local file, you use the local
browser as a transit point. Therefore, do not refresh or close the
current browser, and do not stop the management node service.
Otherwise, the image might fail to be added.
Boot Mode: Select a BIOS mode. Options: Legacy |
UEFI.
Legacy: Support all operating systems. To ensure the usage
stability, we recommend that you use the Legacy mode.
UEFI: Support two types of operating system, including Windows
and CentOS. Specifically, Windows 7 and Windows Server 2008 R2
must use the Compatibility Support Module (CSM).
Note:
The VM instance may fail to work properly if the BIOS mode does
not match the VM instance. Please exercise caution.
For a qcow2 image or raw image,
select the BIOS mode that is consistent with the
encapsulated image.
For an ISO image, select a BIOS mode
as needed. The system will be installed in a wizard mode
according to the BIOS mode that you selected.
If the VM instances that you created need to use the
UEFI mode, we recommend that you select the
corresponding VM image from the following list of
operating system versions.
Operating System
BIOS Mode
Supported Version
Windows
UEFI
Windows 8 or later versions
UEFI (compatibility
module)
Windows 7
Windows Server 2008 R2
Linux
UEFI
CentOS 7.2
CentOS 7.3
CentOS 7.4 or later versions
For a Linux image of CentOS 7.4 or
later versions with the UEFI mode, after you restart a
created VM instance, the VM instance will probably enter
the UEFI Shell. To reboot successfully and enter the
operating system, follow the methods below:
Method 1: Add a script to automatically skip the
UEFI Shell and directly enter the operating
system.
In the operating system that you
installed successfully, run vim
/boot/efi/startup.nsh to create a script
and save the following contents. For the later VM
rebooting operation, the VM instance will skip the
UEFI Shell and directly enter the operating
system.
FS0:
CD EFI
CD centos
shimx64-centos.efi
Method 2: Manually exit the UEFI Shell.
If the
VM instance already entered the UEFI Shell, you
could manually run the following commands to exit
the UEFI
Shell:
Shell> fs0:
FS0:\> cd EFI
FS0:\EFI\> cd centos
FS0:\EFI\centos\> shimx64-centos.efi
For a Windows VM instance (such as
Windows Server 2012 R2, Windows Server 2016, and Windows
10) with the UEFI mode, the following page will be
displayed after the VM instance starts. Press any key to
continue the installation of the VM operating system.
Otherwise, the VM instance will enter the UEFI Shell, as
shown in Press Any Key to Continue.Figure 3. Press Any Key to Continue If the VM instance already entered the UEFI Shell,
you must run the following commands before you boot the
operating
system:
Shell> fs0:
FS0:\> dir
FS0:\> cd EFI
FS0:\EFI\> cd BOOT
FS0:\EFI\BOOT\> BOOTX64.EFI
After
you perform the preceding operations, press any key to
continue the VM operating system installation.
Otherwise, the VM instance will enter the UEFI Shell
again.
CSM: The compatibility module can only be
compatible with devices that work under the Legacy mode. The UEFI
operating system is not supported or not completely supported.
Note: For
Windows 7 and Windows Server 2008 R2, select the compatibility
support module. However, do not select the compatibility support
module for other versions.
Installed QEMU guest agent:
Note:
Make sure that the QEMU guest agent is installed for the imported
images and can be started automatically.
Then, after you select Qemu guest agent, you
can change the password of a VM instance created from the added
image, the password of the VM instances cloned from the VM instance,
or the password of the VM images when the VM instance is
running.
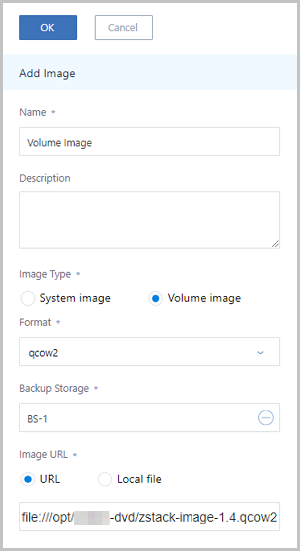
Add a volume image.
On the Image management page, click
Add Image. Then, the Add Image
page is displayed, as shown in Add Volume
Image.Figure 4. Add Volume Image To add a volume image, set the following parameters:
Name: Enter a name for the volume image.
Description: Optional. Enter a description for
the volume image.
Image Type: Select volume image. The supported
image types include qcow2 and raw.
Platform: Select a volume image platform. A
volume image platform decides whether to use KVM Virtio driver
(including disk driver and NIC driver) when you create VM
instances.
Backup Storage: Select the backup storage that
you created before.
Image URL: Enter a local URL or upload a local
file.

 Note:
Note: